Saturday, August 31, 2024

Special Day Rocker Card


Happy Saturday!
It's time for another new

Challenge theme is
ANYTHING GOES

***************************************

 My card for this week's challenge features Autumn colors and was created with Leo Lion Digital Stamp. I made a rocker style card. The patterned background paper is from


I hope you join us this week!


Friday, August 30, 2024

Holiday Mason Jar Lids

Hi there! I'm here today with a fun project created for Clear Scraps!


It’s the end of August and the holidays will be here before we know it!


I know, I can’t believe it either. It seems we just celebrated them and it’s time to get ready again! So if you are wanting to get started with some handmade gifts or, holiday decor items you might enjoy this project.


The products used were introduced last month.


Wooden Mason Jar Lids


Noel Chipboard Punchout Embellishments


Construct the lids by layering and gluing 3 of the included rings together. Next, add the piece with the hole in the middle and finish with the last ring. This is the top of the lid. The solid wood circle will be embellished and inserted into the lid top.


I painted the lid with black acrylic paint. You can leave it raw or paint it or ink it to add some color.


The 3 included wood circles were painted.


My chosen chipboard embellishments were punched out and decorated.

I painted the stocking with green acrylic paint and added white flocking to the top. I also added some glitter glue later.


The snowman was painted with acrylic paint. Black pearls were added later for his eyes and a piece of ribbon was fashioned into a scarf.


I painted the holly first and then added glitter glue.


Adhere the chipboard to the painted wood circles and add any other embellishments desired.


Each of the decorated circles can be changed out on the top of the lid. 


Add these lids to your Mason Jars that are filled with candy or other goodies to give as gifts or decorate your home. They are cute and easy to put together!


I hope you have enjoyed my project as much as I enjoyed putting it together.


Be sure and check out more Clear Scraps inspiration 

by following on social media


Clear Scraps Blog

Clear Scraps Facebook

Clear Scraps Instagram

Thursday, August 29, 2024

Baking Spirits Bright

Happy Thursday!
Posting today on behalf of' 

I am using one of this month's New Release stamp sets. 

Baking Spirits Bright is a 4x6 inch clear photopolymer stamp set

Sentiments include:

Sprinkling some Christmas Joy

Christmas Here I Crumb

Cookies for Santa

Baking Spirits Bright

Sweet Christmas Wishes

A Stamp and Die Bundle Available (Sold Separately) 

Made in the USA


I stamped 8 cookies. 3 of them were stamped on the 
white background piece and the other 5 were fussy cut.
I colored all with pencils.
I stamped the sentiment on a white piece of card stock and used 
a border punch on the bottom of this piece.
2 patterned papers were combined on the card base.

We would love for you to connect with us in the

You can find more Pajama Crafter Stamps inspiration from 
other design team members and are welcome to post your creations
 using Pajama Crafter Stamps products.

Also follow on Instagram @pajamacrafterstamps.

Thank you so much for stopping by!
_________________________________________________
Linking up to:
The Holly and Ivy Christmas Challenge - Anything Christmas Goes
A Place to Start - playing ATG
613 Avenue Create - playing ATG

Wednesday, August 28, 2024

You Are Awesome Altered Frame


Hi there! I'm here with my last Tres Jolie Kit Club Guest Designer project for this month using the Cards, Tags and More Kit for August 2024.

I am creating an altered frame so I pulled the items I think will work well from the card kit and also some from this month’s mixed media kit. These items include 3, 6 x 6 inch papers and various Creative Cuts from the card kit and the frame, gold paint and texture crust from the mixed media kit.

Paint the frame with the gold paint.

Choose a paper from the card kit for the frame opening and  cut down to    6 x 4 1/8 inches. Mount this onto a piece of sturdy card stock measuring    6 1/8 x 4 1/8 inches. Round the corners. 

Take 2 other pieces of paper and time to 3 1/2 x 4 3/4 inches. These are mounted onto a plain piece of cardstock measuring 6 3/4 x 4 3/4 inches.

One of these pieces will slightly overlap the other.

Line this piece up evenly over the frame opening, hold in place while turning over facedown on your work surface. Trace around the frame opening with a pencil. Cut the center of this piece out, forming a frame.

Adhere this frame piece on the front of the wood frame around the opening. Take the texture crust and apply around the edge of the frame opening. I used a pallet knife.

Paint the texture crust with the gold paint.

I also added some bakers twine around the outside edge of the paper frame.


Place the piece that is cut for the frame opening in place. Add Creative Cuts. I combined 2 of the pieces to form an inspirational message, “You Are Awesome” for the frame opening. 

I used foam tape and glue to apply my die cuts.


Thanks so much for checking out my project! I hope I have provided some inspiration for you.

 See my YouTube tutorial for more detail.


Be sure and check out all  of the Tres Jolie products HERE

Also, click on the links below and follow Tres Jolie on Social Media for more info and inspiration!

Facebook

Instagram

TIKTOK

Tres Jolie website

Tres Jolie subscriptions

Tres Jolie Blog

Tres Jolie YouTube

Tres Jolie Pinterest

Friday, August 23, 2024

Flutterby Daisy

Hi there!
Popping in on this fine Friday morning to post for

My card was created with the beautiful


This was a really quick and easy card design.
Just used a pretty patterned paper from Recollections for my background.
I added the image colored with Prismacolor Pencils and fussy cut,
a die cut sentiment, ribbon, a bow and some pearls.

I do hope you'll check this digi out along with all the other
fabulous digis available in Conie's Etsy Shop.

Also, I hope you'll join us over on Facebook at
We'd love to see your creations using Conie Fong digis there!

**************************************************

Conie Fong now has a You Tube Channel where she teaches drawing simple images 
in easy step-by-step drawing tutorials.


Also, we invite you to join the Draw with Conie Facebook Group.
You'll find info on new videos there and inspiration projects from the Design Team. 

Thursday, August 22, 2024

Dashing Through the Snow

Happy Thursday!
Posting today on behalf of' 

I am using one of this month's New Release stamp sets.

Season's Gifting  is a 4x6 inch clear photopolymer stamp set

Sentiments include:

Joyeux Noel

Dashing through the Snow

The Gift of love,
The Gift of peace,
The Gift of happiness,
May all of these be
Yours at Christmas

Seasson's Gifting  Stamp and Die Bundle Availabe (sold separately)


I colored the stamped image with Prismacolor Pencils.
It was fussy cut before adding to the card.
The snowy background is a white on white patterned paper that I inked.
The snow banks were created by hand cutting curves out of white glitter card stock.
The sentiment was stamped on white card stock cut to a banner shape.

We would love for you to connect with us in the

You can find more Pajama Crafter Stamps inspiration from 
other design team members and are welcome to post your creations
 using Pajama Crafter Stamps products.

Also follow on Instagram @pajamacrafterstamps.

Thank you so much for stopping by!


Classroom Door Sign

 Well, here we are! It's that time of year again, Back to School!

Hey there! It's Judy here with my latest project for CutCardStock. Putting together a Classroom Door Sign is fun and pretty easy. This is a great idea for those teacher family members or friends you may have.


Sign Base

I am using an MDF scrolled edge sign as the base. It measure approximately 10 x 8 inches.


The solid card stocks I am using are DCS Discount Card Stock: BlackLessebo Colors Premium Cherry RED Card StockBasis BLUE Card StockLessebo Colors Premium SUNSET Orange Card Stock.


Cougar White Smooth Card Stock is perfect for printing digital clip art and pattern papers.

Cut card stock and pattern papers to layer onto the base.

Sunset pieces are 9 x 6 3/4 inches and 6 x 6 inches. Black piece measures 8 3/4 x 6 1/2 inches. Red Plaid Print measures 8 5/8 x 6 3/8 inches. Cut the Apple Print to 5 7/8 x 5 7/8 inches.

I die cut a layered, scrolled frame with pieces of Black and Sunset card stock


Decorative Elements

 Letters, numbers and banner die cuts are cut out of Red, Blue and White card stock. The clip art is fussy cut.


To spell the teacher's name add the white letters to the banner die cuts. Punch holes in the top of each piece and run twine through. Layer Red and blue numbers and letters for a shadow effect.

Add all of the above elements to the base. Run twine through the holes at the top of the sign and knot in front.

The project is complete.


Thanks for taking a look at my Classroom Door Sign project! 


Join us over on the CutCardStock Facebook Page and the newly revamped Facebook Group Creating with CutCardStock for more inspiration.


And even more inspiration can be found on the CutCardStock Blog

Wednesday, August 21, 2024

Birthday Card & Gift Bag


Hi there! I'm here with my 2nd Guest Designer project for Tres Jolie Kit Club using the Cards, Tags and More Kit for August.


This time around I am creating a birthday card and coordinating gift bag.


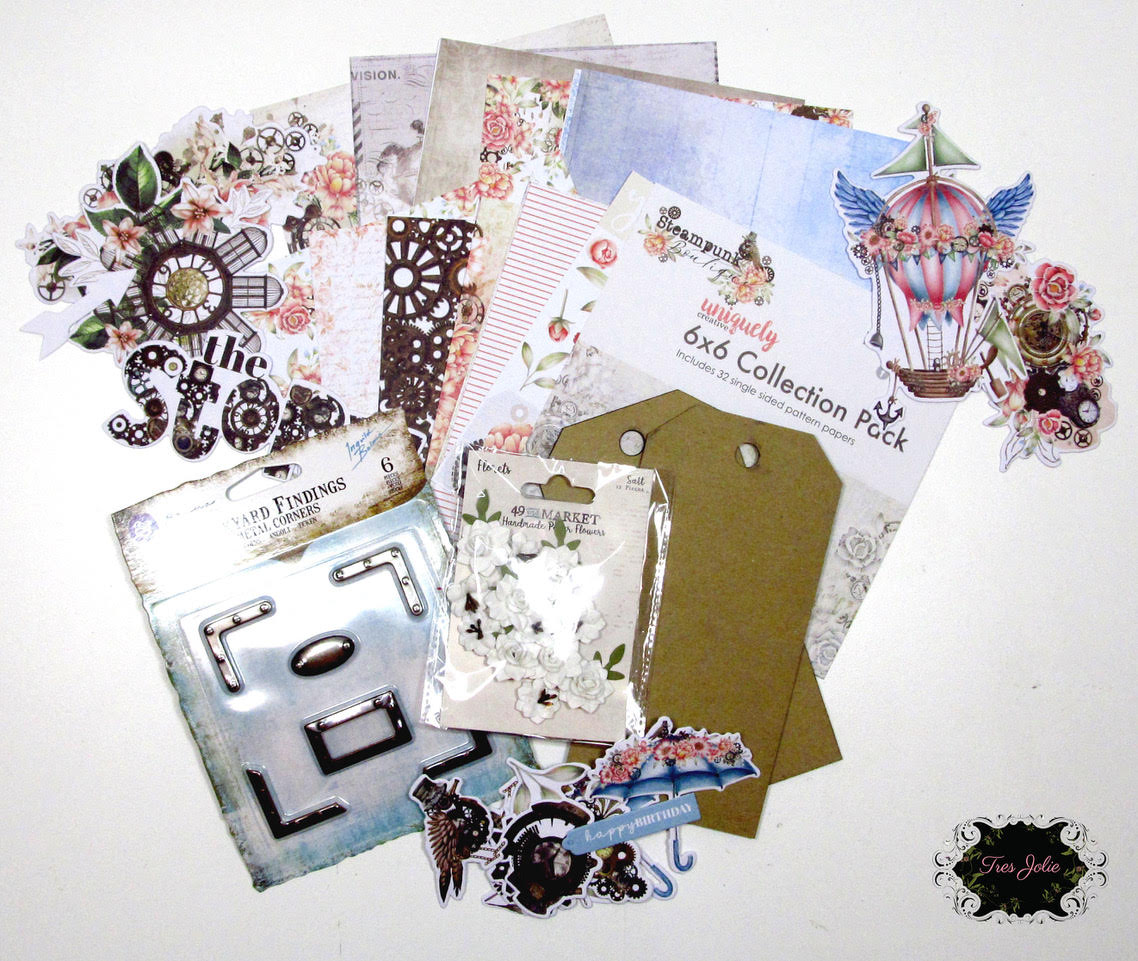
I gathered items from the card kit I thought I would use and a few other items.


Birthday Card

The edges of a 5 x 7 inch card base were inked with Brilliance coffee bean ink. I also inked the top, sides and bottom of one of the chipboard tags from the kit.


A piece of brown metallic card stock was cut to 4 1/4 x 6 1/4 inches to mat a piece of patterned paper measuring 4 x 6 inches.


I cut a piece of another pattern paper to 5 1/2 x 3 inches and adhered to the tag.


Adhere the tag piece to the matted piece at angle.


Cut a piece of the trim from the scrapbook kit to add to the lower part of the matted piece with the tag and adhere to the back.


Add the matted piece to the card base, leaving an even border all the way around.


Time to add embellishments. 


I used one of the larger die cuts from the Creative Cuts pack.

One of the Junkyard find pieces was added over the hole in the top of the tag.

 A sentiment and some of the floral and a gear from the Creative Cuts were added.

3 flowers from the 49 & Market pac were added to finish the card design.


Gift Bag


To construct a 9 x 6 x 3 inch bag, start with two 12 x 12 pieces of card stock. I used 2 pieces from this month’s Scrapbook Kit that is a very pale green polkadot print.


Score on 3 sides of both pieces at 3 inches.


 Next I cut from the outside edge along the horizontal score line to the vertical lines on one piece. 


On the second piece cut to remove the outside squares on the bottom.


To add a decorative edge to the top of the bag, cut 2 strips of patterned paper 

2 3/4 x 12 inches.


 Score at 1 inch along the long side of each strip.

Just a note that it is easier to use a paper versus a card stock. 

I used a 12 x 12 paper from my stash I thought coordinated well with the other materials.


 The score line goes over the top edge of the of the large pieces with 2 inches along the outside and 1 inch on the inside.


To form the bag adhere the 2 pieces together. 


This is done by taking the piece with the 2 squares removed and 

adhering the 3 x 6 inch flap onto the center of the other piece between the score lines.


Next fold up the piece just adhered and attach the 2 small flaps to the sides along the inside.


Fold up the other piece and attach both on the outside edges to form the bag.


To coordinate the bag with the birthday card, I basically made another card to add to the front side.


I cut a mat out of brown metallic card stock measuring 5 1/4 x 6 1/4 inches and added the 2 left over pieces of pattern paper from the birthday card. These measure 3 x 6 inches and 2 x 6 inches. 


A piece of the trim was cut and added along with die cuts and and flowers.


Adhere to bag front.


I punched 2 holes on the front and back about 1 1/2 inches in from both sides and

 about 1/2 an inch from the top.


I ran ribbon cut to 18 inches through the holes and tied knots to form handles. The  knots are tied on the outside, but can be tied inside if you prefer.


One of the Prima Junkyard Finding pieces was added to the top center of the bag.

The bag is complete.


Thanks so much for checking out my project! I hope I have provided some inspiration for you.


See my YouTube tutorial for more detail


Be sure and check out all  of the Tres Jolie products HERE


Also, click on the links below and follow Tres Jolie on Social Media for more info and inspiration!


Facebook


Instagram


Tres Jolie subscriptions

Tres Jolie Blog

Tres Jolie YouTube

Tres Jolie Pinterest


***********************************

Linking up to:
A Place to Start - ATG option
613 Avenue Create - ATG option

_________________________________

Challenge Recognition