Saturday, May 27, 2023

Happy Father’s Day Card

Hi there!
It's time for this week's 

The challenge theme is
Anything Goes.

It's all about cards for Father's Day for my DT card this week!
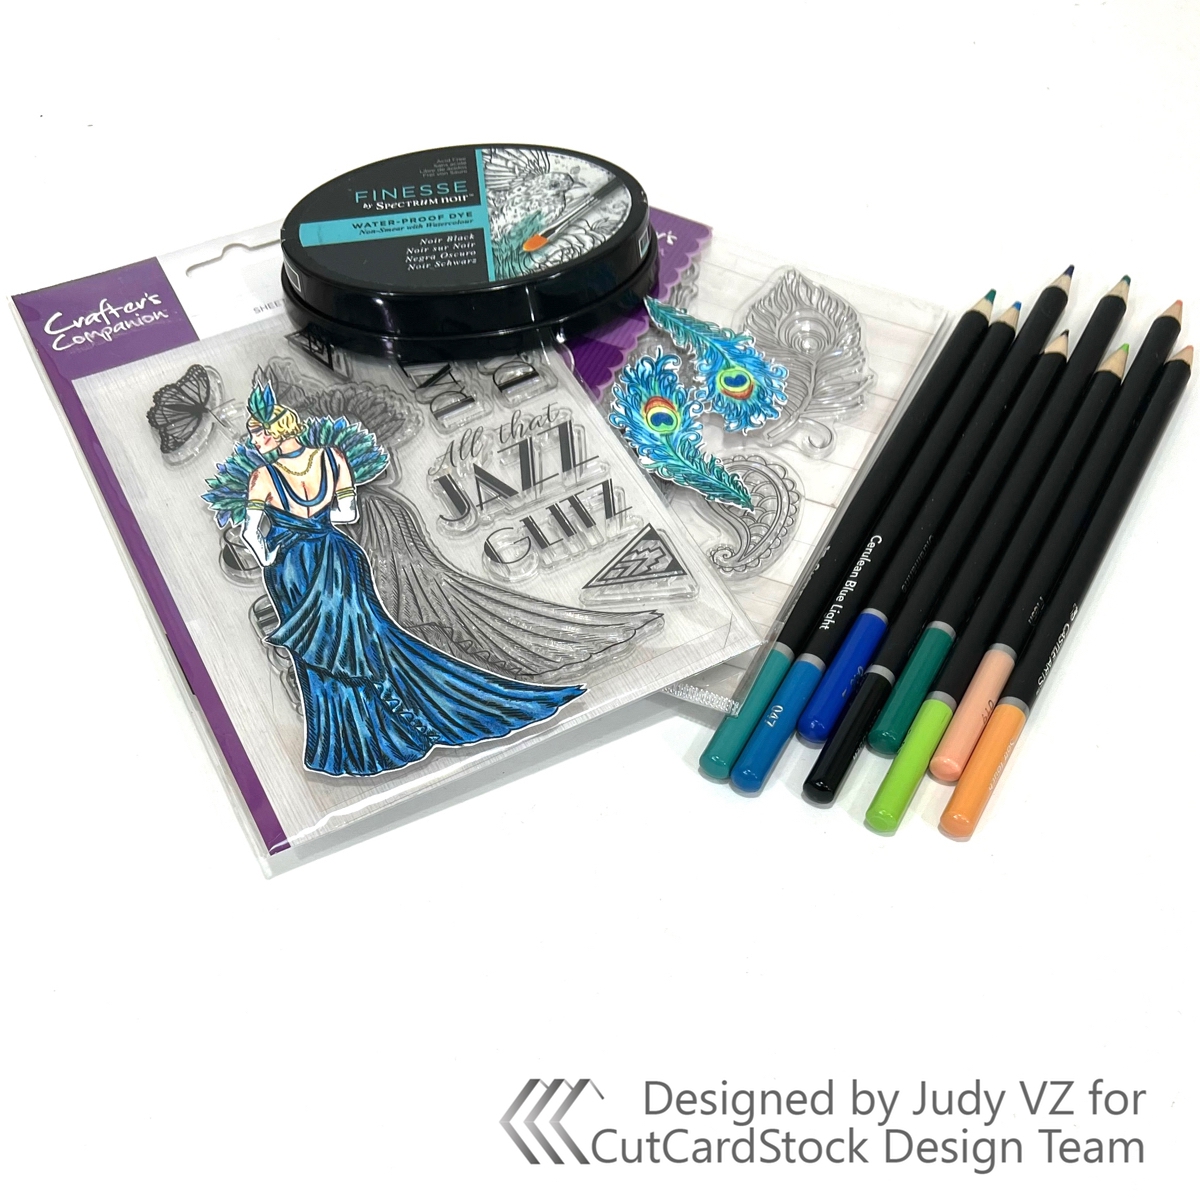
I have used 2 clear stamp sets to create my DT card.
The focal image was stamped from the
I colored with Castle Arts Pencils and added some stickles.
This piece was die cut and matted.
I used the Greatest Guy 4 x 4" Stamp Set for the
"Happy Father's Day" sentiment.
The patterned paper used is from
3 enamel triangles were added to embellish.

I hope you'll join us!

_______________________________________________
Linking up to:
Krafty Chicks Challenge - All Occasions
Try it on Tuesday - Keep it Simple

Friday, May 26, 2023

Sophie and Puppy

Happy Friday!
I'm posting with some inspiration from


I've had this adorable digi for a while and thought it
was time to color her up and make a card.

I made a 5 x 7 inch card base and covered the front with
a bright purple card stock. 3 patterned digital papers were
cut into strips and layered on top.
I colored Sophie and her puppy with Prismacolor pencils and fussy cut.
They are popped with foam tape onto a matted rectangle that
was stenciled and inked. A white fence was die cut along with
some mini flowers and foliage and added the card.
I also die cut "Friend".

Check out this cutie and all the other digis available at

And don't miss out on more inspiration over on Facebook

I appreciate you stopping by!
Have a great day!

_________________________________________________

Linking up to:
Crafty Catz Challenge - ATG w/option add flowers
Daisy Chain Challenge - For the Girls


Thursday, May 25, 2023

Chibi Italian Brother L

Hello there! Today I'm posting for Stampers Delights.

The card I'm sharing was created with one of the "Italian Brothers" digital stamp sets which are exclusive to members of the Digital Stamp and Coloring Club and the Digital Art VIP Club


I colored 2 of the digis with pencils and fussy cut. The third digi used, the bricks, were printed on orange card stock. The grout was colored in with a marker.

Clouds were die cut and adhered to the blue inked background and a sentiment was stamped. I added a die cut border near the bottom of the card.

Check out the Digital Stamp and Coloring Club.
Included:
Creative Community
Challenge Image
PLUS:
Exclusive character packs:

  • Exclusive Yearly Theme: This year is Alice in Wonderland. See all your favourite characters come to life within chibi/anime style.

  • 3-4 image packs each month.

  • 3-4 Colouring pages.

  • Early access to presales.

  • Supportive community.

  • Behind the scenes.

  • Work in progress & sneak peeks.

Check out membership in the Wonderland Digital Stamp Club.

Included:

  • Creative Community

  • Challenge Image

  •  This beautiful classic story to life in chibi/anime art style.

PLUS:

Tuesday, May 23, 2023

Just Do Nothing Noodle Panda

Just Do Nothing Today

That's exactly how I feel today.
How about you?
Do you have those days too?
I'm sure you do. I think most of us do.

But I thought I could at least put a quick post together sharing one of the 
"Noodle Panda" cards I've put together for Polkadoodles.

This sweet little guy was colored with Prismacolor Pencils and fussy cut.
I put my background together with 2 patterned papers and hand cut banners.
A circle frame was die cut to pop Noodle on to.
The sentiment was printed and trimmed into a banner.
I added 3 glitter dots for embellishment.

Great deals can be had on this new collection by using code
NOODLE35 for a limited time.

If you're not into pandas and find other Polkadoodles items you'd like
use code JUDY-10 for 10% off your entire purchase.
(These codes can not be combined)

I appreciate you stopping by!
____________________________________________________

Linking up to:
Cutie Pie Challenge - Four Legged Friends
Crafty Animals - ATG w/animals
Critter Crazy Challenge - ATG w/featured Critter


Sunday, May 21, 2023

Noodle Panda Cuties

Happy Sunday!
I hope you're all having a fabulous weekend!

I'm popping in to share another card created with new products from

I have used
from the new


I colored these cuties with Prismacolor Pencils and fussy cut before
placing them on my stenciled and die cut background.
The patterned paper is part of the collection
The sentiment came from

This is a great collection that can be purchased individually or 
in a variety of available sets.
Check them out!
They are so cute and appropriate for any occasion!

Thanks for stopping by!

____________________________________________
Linking up to:
Crafty Catz - ATG/Option Twist Summer
Crafty Animals - ATG w/animals
Critter Crazy Challenge - ATG w/featured critter
Stamping Sensations - ATG with option to add a stencil
Crafty Calendar Challenge - Anything but Square


Saturday, May 20, 2023

Art Deco Card

Hey there! Today I’m excited to share an art deco card project with you today! I’ve used four fabulous card stocks from CutCardStock with four dies, an embossing folder, 2 stamps, pencil colors, glitter gel pens and gilding wax. Put them all together and you get a beautiful card. Well, I think it’s beautiful! I love the way it turned out!


Card Base

Starting with a 5 1/2 x 11 inch piece of Black DCS Discount Card Stock I made an easel style card base.

Score at 2 3/4 and 5 1/2 inches along the 11 inch side and fold on each score line as seen below.


Creating the Fan

To create the “fan” I cut 5 pieces of Black DCS Discount Card Stock. The center piece measures 2 x 5 1/2 inches. Cut 4 pieces to 1 x 5 1/2 inches. I die cut the top edge of each piece.

Using DCS Gold GLITTER Heavyweight Discount Card Stock, cut 1 piece to 1 7/8 x 5 3/8 inches. Cut 4 pieces 7/8 x 5 3/8 inches. With Stardream Metallic SILVER 105 lb Card Stock, cut 1 piece 1 3/4 x 5 1/8 inches and 4 pieces 3/4 x 5 1/8 inches.

Next I ran the silver pieces through an embossing folder and added gold gilding wax to the raised areas with a dried baby wipe.


Layer the black, gold and silver pieces. Take the largest piece and adhere 2 of the smaller pieces on each side at an angle to form a “fan” shape. Cut the bottom edge straight across.

Card Assembly

I cut 2 pieces of the gold glitter card to 1 3/4 x 2 5/8 inches and 2 pieces of the metallic silver to 1 5/8 x 2 1/2 inches. Layer these and adhere to the outside and lower edge of the card front, leaving a narrow edge of the black showing. The fan piece is adhered to the center of the card front.


I layered a piece of gold glitter card measuring 5 3/8 x 5 3/8 inches with a piece ofCougar White Smooth Card Stock cut to 5 1/4 x 5 1/4 inches. Add these to the inside leaving a narrow black border.

A stop is needed on the inside of the card base to form the easel. I cut pieces of the black, gold and silver card stocks. The black piece was die cut on one edge with a die coordinating with the dies used for the fan. The sentiment was die cut out of black card.

To create the focal and some embellishment, I stamped a “Roaring Twenties” themed lady and feathers on Cougar White Smooth Card Stock. These were colored with Castle Arts Pencils and glitter gel pens and fussy cut.


Finishing

The pieces for the stop were layered and adhered with foam tape to the inside of the card. I added the feathers on either side. My lady was adhered with foam tape to the fan. A few pearls were added to complete my design.


I hope I’ve provided a little inspiration with my Art Deco Card project!

We would love for you to connect with us over on the CutCardStock Facebook Page and the Facebook Group Creating with Card Stock for more inspiration.

*******************************************
Linking up to:


Thursday, May 18, 2023

Great Day with Noodle Panda

Hi there!
Who loves pandas?
I know I do, but what about you?

Well if your answer is yes, you have to check out the new
from

They are so cute and fun and perfect for all of your crafting!


My card was created with

I colored this cutie with Prismacolor Pencils and fussy cut.
The sentiment was printed on white card stock,
 trimmed to a rectangle and layered onto a blue card base.
A patterned paper was printed, cut and adhered to the other side of the card base.
Coordinating paper was printed, trimmed to a rectangle and matted.
A frame was created with 2 die cut circles layered.
I popped the panda with foam tape and added to the frame.
Sequins were added as embellishment.

Check these cuties out!
You'll be glad you did!
________________________________________________
Linking up to:
Crafty Animals - ATG w/animals
Critter Crazy Challenge - ATG/featured critter


Tuesday, May 16, 2023

Summer Bride

Hey everyone!
I hope we are all doing well.
I certainly have no complaints and that's always good.
It is sunny and warm here in Colorado after
a few gloomy days with rain.

Today I am sharing a card made with a beautiful digi from

This is Summer Bride. 


I have had this beauty for quite a while and
thought it was time I colored her up and put something together.


I colored her with Castle Arts Pasteltint Pencils. A little clear sparkle pen
was added to some of the dress after I fussy cut.
The background was put together with a die cut using
a Crafter's Companion die and a patterned paper also
from Crafter's Companion. I added a little color to
 the top of the die cut with Spectrum Noir Marker and a pencil color.
All of the flowers were fussy cut from the patterned paper.
Some of you probably think I'm crazy for doing all that fussy cutting,
but it is something I rather enjoy!
I die cut the "Best Wishes" sentiment with a die from Crafter's Companion.

I appreciate you stopping by and hope you have a great rest of the week!

*****************************************
Linking up to:
Crafting Happiness Challenges - ATG/Option Flowers
613 Avenue Create - ATG/Say it with Flowers option
Allsorts Challenge - ATG/Embellish Option


Saturday, May 13, 2023

Stenciled and Stamped Birthday Card

Hello there!
It's Saturday and that means it's time for a new 

The challenge them is
Anything Goes.

 My DT card was created with a "wings" theme using
Hearts and Flowers Butterfly Stamp 1. I stamped the butterflies and
colored with sparkle pens before fussy cutting.
 The flowers from stamp 1 were colored with pencils and fussy cut.
The background was stenciled using the
The flowers and large butterfly were adhered to a layered die cut circle.
I stamped the sentiment from the
Ribbon was added behind and to the side of the die cut circle to complete my design.


I hope you'll join us this week!
And, thanks for stopping by!

************************************************
Linking up to:
Crafty Catz - ATG/Option Add Ribbon, Lace or Twine
Try It on Tuesday - Use a Stencil
A Place to Start - ATG/And Another Thing
613 Avenue Create - ATG/Say it with Flowers


Friday, May 12, 2023

Birthday Benny

Hello!
Today I'm sharing some DT inspiration for


It's not very often I make cards that are appropriate for males.
My style is more along the lines of "classic and elegant".
But, since I have a grandson now, I think I will be creating
more that are geared towards boys.
And, Conie Fong has some great digital stamps with boys.

I colored up this cutie with Prismacolor Pencils and fussy cut.
My 5 x 6 1/2 inch red card base was covered with a
piece of white card stock for the background.
 I added a rectangle of glittered and patterned card stock,
a red, hand cut banner and layered circle die cuts.
Bunting was die cut and layered in red and white.
I added glitter letters to spell "happy birthday" and added red enamel dots.
A blue bunting was die cut and added.
The "celebrate" piece was cut from card stock.
I, lastly, popped Benny with foam tape onto the circle frame.


Check out this cutie and all the other digis available at

And don't miss out on more inspiration over on Facebook

I appreciate you stopping by!
Have a great day!
_____________________________________________

Linking up to:
Addicted to Stamps and More - Dies and/0r Stencils
CRAFT Challenge - Birthday
Seize the Birthday - ATG/Option Wheels

Thursday, May 11, 2023

Chibi Italian Brother Daisy Flowers

Hey there! Today I'm sharing my first May project for Stampers Delights!


I have used one of the "Italian Brothers" digital stamp sets which are exclusive to members of the Digital Stamp and Coloring Club and the Digital Art VIP Club


The princes digi was colored with Prismacolor pencils ad fussy cut. My background was created with a combination of stenciling, die cutting and dry embossing. The castle was downloaded from the internet. I stamped the sentiment.

Check out the Digital Stamp and Coloring Club.
Included:
Creative Community
Challenge Image
PLUS:
Exclusive character packs:

  • Exclusive Yearly Theme: This year is Alice in Wonderland. See all your favourite characters come to life within chibi/anime style.

  • 3-4 image packs each month.

  • 3-4 Colouring pages.

  • Early access to presales.

  • Supportive community.

  • Behind the scenes.

  • Work in progress & sneak peeks.

Check out membership in the Wonderland Digital Stamp Club.

Included:

  • Creative Community

  • Challenge Image

  •  This beautiful classic story to life in chibi/anime art style.

PLUS:

Wednesday, May 10, 2023

Flowers for Mom

Happy Wednesday!
It's time for me to share my DT card for this month's challenge at

The theme for this challenge is: 

~ Flowers for Mom ~

 Our sponsors for this challenge are: 
(listed in alphabetical order)

Prize ~ $10 Gift Certificate
Fred She Said Designs offers a wide variety of digital products with a floral flair and cute characters too - Digi's, Pre-colored images, Papers, Sets, Fred's Flower Kits, and even digital cutting files.  Have some fun with Fred!

* * * * * * * * * *


Prize ~ $10 Gift Certifcate
______________________________

Fred She Said


I colored the digi with Prismacolor and Castle Arts Pencils and fussy cut.
The sentiment was stamped.
I used a patterned paper and some cut parts from a Recollections 12 x 12 paper pad.
The flowers I embellished with are from the digi set used.
I colored and fussy cut them.
Pearls were added to finish.

Thanks for stopping by!

Saturday, May 6, 2023

Seashell Rosealea

Happy Saturday!
Hi there!
Today I'm excited to share a card created for

I have used a new release digital stamp for this month,


I colored this beautiful image with Prismacolor Pencils and fussy cut.
The background paper is from a 12 x 12 paper pad from Recollections.
The digi is framed by a die cut created with a Memory Box die.
The open circle and mermaid are from the same die.
I also die cut the sentiment using a Gemini die.
Three glitter dots from Dollar Tree were added.


Check this beautiful digi out along with all the other available from the

*******************************************
Linking up to:


Friday, May 5, 2023

Altered Bottle

If you’re looking for a unique home decor or gift idea, I have a suggestion for you.

Hey there! Today I'm here with an altered bottle project created for CutCardStock

Look around. Do you have any wine, whiskey, perfume or other type of bottle lying around? If so turn it into an art piece. It’s fun and anything goes. There’s no right or wrong.


Materials

Bottle, tissue paper, decoupage medium, paint brush, acrylic paint

Card Stock, dies, pearls, ribbon. adhesive, pencil colors, glitter gel pens

Bottle Prep

Gather the bottle and tissue paper. Remove labels and thoroughly clean the bottle.


Brush the bottle with decoupage medium and apply the tissue paper over the entire surface. I like doing this with wrinkles in the tissue to add texture.


Paint the tissue with desired color. I used a light blue metallic acrylic paint. You can skip this step if you use a colored tissue paper in the color you want as your base.


Die Cutting

Choose a theme to work with and select appropriate dies. I have Parisian themed dies and chose to go with them. 

Card Stock used: Stardream Metallic COPPER 105lb 8.5 x 11 Card Stock,  Stardream Metallic Saturn 126lb 8.5 x 11 Card StockStardream Metallic SILVER 105 lb Card StockStardream Metallic SAPPHIRE (blue) 105lb 8.5 x 11 Card Stock, Cougar White Smooth CardStock 8.5×11,  Pop Tone GUM DROP GREEN 8.5×11 Discount Card Stock

I cut 2 fences to wrap the bottle, 3 Eiffel towers, 2 of the “Ooh LaLa” and one lady.

Color was added to the white lady piece with pencils colors and gel pens.


The multiple towers and words were cut in 2 colors and layered to create a shadow effect and give a little more stability.


Building the Design

A little bit of darker blue paint was to the center front of the bottle and randomly on other parts of the bottle. The die cuts are added.


Finish with Embellishments

I ended up die cutting, adding a little color and layering flowers to add with some leaf die cuts. Pearls and ribbon were added as well.


I’ve enjoyed sharing this project with you and hope I’ve provided some inspiration for you.

We would love for you to connect with us over on the CutCardStock Facebook Page and out the Facebook Group Creating with Card Stock for more inspiration.

____________________________________________

Linking up to:
CRAFT Challenge - Recycle (recycled bottled)
Pearly Sparkles Challenge - Anything but a Card
Crafting From the Heart - ATG - no cards
A Place to Start - ATG/And Another Thing Option