Wednesday, July 29, 2020

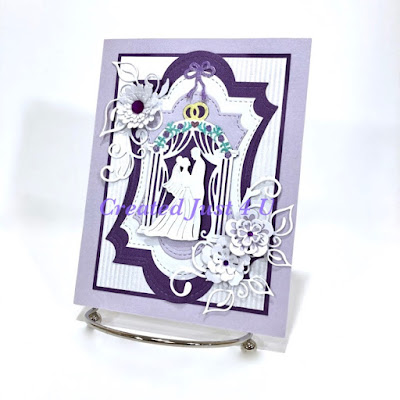
In Love Arts Wedding Card

Hey there!
Today I have a tutorial of a wedding card I created using 4 die sets from


These dies are of great quality for the price and
I think you will like them as much as I do if you give them a try.

Let's get started.

I used a white 5 x 6.5 inch card base and 
added a lavender shimmer card stock.
A darker shade of purple was added next and
I added a tone on tone paper.
Next I cut 3 
These die cuts were layered and adhered to the card base.
Next I cut

I backed the arch with dar purple card stock.
and

I layered the flower die cuts and added gems to the centers
Before adding the die cuts above
I decided to add a little color to 3 of the pieces with glitter gel pens.
I adhered the arch piece, the flower arch and then
popped the bride and groom  with foam tape.
The bow was added next.
I arranged the vines and leaf pieces around the frame and glued down.
The flowers were addd last with a little hot glue.


 I hope I provided you a little inspiration.


                                             If you would like to give these products a try 
use COUPON CODE :  G-20396
for a 15% discount.

I'm linking up to:
Unstampabelles Challenges - Celebrating Relationships 
My Time to Craft - Summer Wedding


Tuesday, July 28, 2020

Home Decor Heart

Hey there!
Today I'm over on the
 sharing a home decor piece
that anyone can create using a variety of dies from


I started by gathering some supplies:
9 x 10 x 3/8 inch chipboard heart
12 x 12 inch printed card stock
white and pink printer paper
nesting flower die set


I die cut several pieces of the printer paper in various
sizes with the flower dies.  


I layered the flower pieces, poked a hole in the center
and spritzed with water.


Taking 1 layer at a time, I "scrunched" each
layer up to the center.


These are the 3 flowers I created.
Using the various sizes and varying the number of layers
gives each flower a unique look.


I traced the heart on the backside of the printed card stock and cut.
I painted the edges of the heart with white acrylic paint,
adhered the printed card stock with decoupage medium
and added a piece of pink picot edge ribbon.


I decided I wanted to add a little texture to the heart base,
so I used a frame die and a honeycomb die
and cut and trimmed, in what I thought looked good
and added the effect I wanted, before adhering to the heart base.


I added the flowers and die cut some foliage and butterflies
to complete my design.


Dies used:


I hope I've provided some inspiration for you to
 play and create with your dies and we'd love for you 
to come and join in the fun at the Dies R Us Challenge Blog. 
There's a new challenge theme offered on the 1st and 15th of each month and one lucky randomly drawn winner will receive a gift voucher prize to the Dies R Us Store. 
For your convenience, all the important Dies R Us links are provided below.

Monday, July 27, 2020

July Designer Inspiration for CAAB

Hello there!
Today I'm sharing an art journal page using
Sunflower from


I colored the image with Spectrum Noir Markers and fussy cut.
I inked the background of my journal page
to create the background for the digi.
The flowers on the corners were due cut and colored
with markers. I cut 4 strips of card stock to create a frame.
The quote was stamped.


I hope you like my project and
 that you'll check out this stamp
along with all the other  products available at

And, don't forget to join us each month for the Blog Challenge


I'm linking up to:
Crafts Galore Encore  - ATG


Friday, July 24, 2020

Crafty Friends Forever

Hi there!
It's time for this month's
Kawaii New Release 
at
My DT card uses


I die cut a scalloped circle shaped card.
The image was colored with Prismacolor Premier Pencils and fussy cut.
The sentiment is included with the image. It was printed and die cut.
I added embellishments from a Crafter's Companion Birthday paper pack.


For more on this and all the other new Kawaii releases hop over to the

Christmas Puppies

Happy Friday!
I have 2 cards to share today
that were created with new digis from

Dina has created 7 new digis and
they are the cutest little Christmas puppies!

My first card uses

I'm linking this card to:

Cute Card Thursday - Christmas in July 
                                                      A Bit More Time to Craft - ATG
The second uses


I'm linking this card to:
Crimbo Crackers - Christmas Related

I colored both images with pencils and fussy cut.
The DP I used on both cards is from the
I did some dry embossing on both cards and
the sentiments are stickers I had in my stash.


You can head over to the 
Digital Doodle Studios FB Group
to see more from the Design Team.
 

Have a great weekend!


Holiday Party Invitation

It's time for this week's


The Design Team was tasked with creating
a family Christmas party invitation.

You can find lots of great products to create 
your own party invitations at Polkadoodles!
I used Too Cute Frosty Tree Haul for my focal.
The frame, patterned paper, tree and snowflake
embellishments are all from the 


I printed the frame to the size I wanted, then
layed out the wording for the invitation in Word
and printed onto the frame and fussy cut around the outer edges.
I colored the snowman with pencils and fussy cut.
Did a little more fussy cutting of the trees and snowflakes.
I used one of the embossed digital papers as the background.

I hope I've inspired you to try creating your own invitations!
I think I may have to create some more!

I'm linking up to:

Sunday, July 19, 2020

Beautifully Magical

Hello there!
It's my turn, once again, to offer up some inspiration for

If you have not checked out the "Pairable" sets you need to!
They are just so cute and have sentiments
and little extras included to go with the main images!
And, you can also find some beautiful patterned paper packs
which you should also check out!


I colored the sweet little dragon with pencils.
I colored 3 sets of flowers with inkonic pens.
My background is one of the pretty digital papers.
As is my usual, I did fussy cutting.
I die cut a frame and did some layering.
The sentiment was printed and die cut.
3 enamel dots were added to the lower left edge.


I hope you'll check out all the fabulous products at 


We also invite you to join us for our monthly challenges at


And, of course, we would love to see you over in the

Have a great week!