Sunday, February 28, 2021

Missing Your Face

Hey!
I'm popping in with another post today to
share a card I made using another one of the new digis from

This cutie is from the Honeypie Collection.


I colored the image with Copics and fussy cut.
The background was created with
I fussy cut the flowers from one of the papers in the
The sentiment is from 

Thanks for taking a peek and 
have a great week ahead!

I'm linking up to:


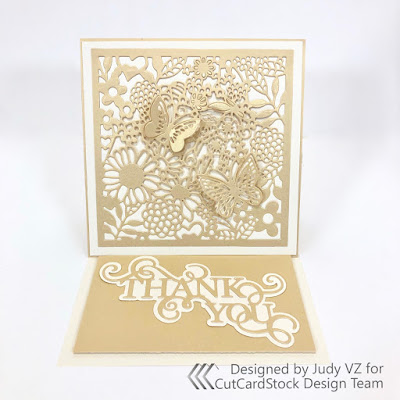
Thank You Easel Card

Hi there!
Today I'm over on the CutCardStock Creative Blog with a card project 
created with some fabulous card stocks from CutCardStock
I think it's always a good idea to keep some "thank you" cards around. 
You never know when they'll come in handy, right? 
So I decided to make one that's made a little more special 
with some very nice card stocks, die cuts and in an easel style.


I started with CLASSIC CREST RECYCLED 100 NATURAL WHITE 80 LB CARD STOCK 8.5X11 and created the card base by cutting to 11 x 5 1/2 inches. I scored at 2 3/4 and 5 1/2 inches.


I chose a Create a Card die from Crafter's Companion and cut using CLASSIC LINEN 84 LB GOLD PEARL 8.5X11 CARD STOCK and a Gemini Sentiment Die, which was cut out of the same gold with the outline cut out of the natural white used for the base.


I constructed the front panel of the card by layering a 5 1/2 inch square of gold, a 5 3/8 inch square of natural white and the die cut panel. This was adhered to the scored 2 3/4 inch area of the card base.


Next comes the inside or bottom of the card. I cut a rectangular piece of gold and adhered with foam tape to give dimension and serve as the "stop" for the card front.


I added the sentiment piece layered onto the gold rectangle.


And now we're ready to complete by adding some pearls.


I hope I’ve inspired you with this project! If so, please leave a comment below, and we would love for you to connect with us on our Facebook Page.

I'm linking up to:
Die Cut Divas - Fun Fold

DT Favorite

Saturday, February 27, 2021

Honeypie

Hello there!

This morning I am sharing a card I made using
one of the digis from a new collection at

She is one of 6 new digis in the collection.
Be sure and check them out HERE!!!


I colored her up with markers, fussy cut and added a little to her dress 
with a white gel pen.
My background paper is from Serenity Fairy Wishes Paper Heaven 2.
I used some washi tape behind the digi and die cut circles.
I added a few sequins for embellishment.

I hope you check this collection out!

I'm linking up to:
Creations in Pink - Mainly Pink


Gem of a Challenge Mother's Day

Happy Saturday!
It's time for a new

This challenge is sponsored by Polkadoodles


My DT project is a Mother's Day card using


I die cut a flower shaped card base.
The digi was colored with Copics and fussy cut.
I did a little more die cutting as the background for my image.
The sentiment was computer generated, printed and die cut.
I added a few sequins as embellishment.

I hope you'll join us this time around!
We love to see what you come up with!

I'm linking up to:
Colour Crazy Week 7 - ATG colored


Sunday, February 21, 2021

Ewe Are Special

Hello there!
I'm so happy to share a cute little card 
I created for my second inspiration project this month for


I colored the digi images with pencils and fussy cut.
The lamb, fence, grass and flowers are all included in the digi set,
with even more to play with and several sentiments.
I inked up the background.
The sentiment was printed and fussy cut.
The clouds were die cut and I added some enamel dots.

I hope you like what I came up with and
that you'll check out this digital set along with
all the other products available at


We also invite you to join us for our monthly challenges at


And, of course, we would love to see you over in the


I hope you all stay safe and have a great week!  


I'm linking up to:
Aud Sentiments Challenge - ATG + Sentiment
Crafty Animals - ATG w/animals


Friday, February 19, 2021

For You Mother

It's time for this week's


 I've created a round Mother's Day card for my DT project this week using
I colored the digi with Prismacolor Pencils and fussy cut.
The card, flowers and sentiment were die cut. I added some twine and glitter dots.


I hope to see your creation entered in the challenge!

I'm linking up to:
Aud Sentiments - ATG + Sentiment


Thursday, February 18, 2021

February Thrifty Thursday

Hello there!
It's time for this month's Thrifty Thursday Event at

Thrifty Thursday is great as you can pick up
many favorite digis on sale!
Be sure and check out this month's featured products HERE!

My DT project was created using

This image would would be good for sympathy cards but also , Christmas and valentine.
Digital Download

  • 2 Design
  • 2 Sentiments
  • 10 Digital Stamps
  • JPG & PNG formats
  • 300 dpi

I love this beautiful digi and can see myself using it for many projects.
I colored with Prismacolor pencils and inked the background.
The borders on either side were die cut using Gemini dies.
I printed and fussy cut the individual feathers.
The sentiment was printed and die cut.
A few pearls were added to complete my design.

I hope you'll check out this month's deals!
And for more DT inspiration visit the
and 

I'm linking up  to:
Aud Sentiments - ATG + Sentiment

Monday, February 15, 2021

Hexagon Design Card

Hey there!
Today I'm over on the
 with a card design using hexagon dies from


I used white and burgundy card stocks and 2 coordinating patterned papers.

Using


(not available but there are other alternatives)

I die cut 4 hexagons out of patterned paper
2 flowers and 1 flower center to layer
2 foliage pieces
1 word die

I did decide to cut a few more hexagon pieces and
layered behind the patterned pieces to give a little dimension.


I made a 5 x 6 1/2 inch card base with white card stock.
Cut a piece of burgundy card stock to 4 3/4 x 6 1/4 inches
Die cut 3 hexagons into the burgundy card stock using the negative.
Layer the burgundy on to the card base.


I adhered the patterned hexagons on to the card
and added the other die cuts.
I added some pearls to finish.


I hope I've provided some inspiration for you to
 play and create with your dies and we'd love for you 
to come and join in the fun at the Dies R Us Challenge Blog. 
There's a new challenge theme offered on the 1st and 15th of each month and one lucky randomly drawn winner will receive a gift voucher prize to the Dies R Us Store. 
For your convenience, all the important Dies R Us links are provided below.

Saturday, February 13, 2021

Spring Penny Slider

Happy Saturday!
It's time for a new

This challenge blog is sponsored by Polkadoodles. 


My DT card is spring inspired, although it is far from being spring here in Colorado,


I colored Agnes with Copics and fussy cut.
My card design is a penny slider.
I cut the slider slot with a paper trimmer.
The sentiment was computer generated.
Mini flowers were added.

I hope you join us!

I'm linking up to:
Crafty Animals - ATG w/animals


Friday, February 12, 2021

For Ally

Hello there!
Today I am taking part in a very special
"Cards for Ally Instagram Hop".


Ally Santaclara was a very sweet, talented and inspirational
colorist and card maker who suddenly passed away this past December.
I know all who knew and loved her have been left with a huge hole in their hearts.
But she always did and know still does "Shine Bright", hence my card.


Using Angel Prayers from Conie Fong


I hope you'll join those of us that are posting 
in remembrance of Ally over on Instagram.

Congratulations Pop Up Box Card

Hi there!
I'm on the CutCardStock Creative Blog today!
Do you have a card style that is your favorite to create? 
I do and it is the Pop Up Box Card! 
I love making these for any occasion and 
I think this one turned out beautifully using card stocks from 


I cut a piece of the BASIS BLACK CARDSTOCK to 10 1/2 x 7 inches for the card box base and scored at 2 1/2, 5, 7 1/2 and 10 inches along the long side. Next turn so the short side with the 1/2 inch score line is across the top and score at 3 1/4 down to the last score line.


Remove the top part of the 1/2 score line to form a tab on the bottom and cut along the other 3 score lines down to the horizontal score line, this is all on the 3 1/4 inch end.


Now we are ready to decorate the box and flaps. I used the CLASSIC LINEN GOLD PEARL CARD STOCK and cut 3 2 1/4 x 3 1/2 inch pieces, 3 2 1/4 x 3 inch pieces and 1 2 1/4 x 6 3/4 inch pieces.


The 3 1/2 lengths are adhered to the bottom of each panel of the scored piece of black card stock. Turn the black piece over and adhere the 3 inch pieces to the panels that are cut. Fold the black card into a box and adhere the tab to the inside of the unscored side to form the box. Adhere the 6 3/4 inch piece of gold to the back inside panel.


Next I cut 3 pieces of CLASSIC CREST RECYCLED 100 NATURAL WHITE CARD STOCK to 2 1/8 x 2 7/8 inches and a piece measuring 2 1/8 x 6 5/8. I opted to die cut a border on each of these pieces, centered and adhered over the gold. Now you need 2 pieces of 1/2 x 3 1/2 inch pieces to hold the pop up elements. Score these pieces at 1/2 and 3 inches along the long side, fold to form tabs and adhere to either side inside the box.


I die cut several pieces of each of the card stocks in different size stars.


These pieces are then adhered to strips of various lengths of acetate and attached to the 2 strips inside the box. I also die cut a few flourishes to add. The sentiment was stamped, embossed and die cut before adding to the front flap.


I hope I’ve inspired you with this project! If so, please leave a comment below, and we would love for you to connect with us on our Facebook Page.

I'm linking up to:
Die Cut Divas - Fun Fold


DT Favorite