Saturday, September 30, 2023

Halloween Pumpkin Card

It's Saturday and that always brings on a new

This challenge theme is
ANYTHING GOES

 I've created a pumpkin shaped card for my DT project this week.
Patterned paper was printed from 
die cut into 1 oval and 2 circles cut in half and glued together for my base.
I inked the edges of the oval and circle die cuts.
The focal image is Witch Cauldron Halloween Gnome.
I colored her with Prismacolor Pencils and fussy cut.
A few die cuts were added and the sentiment was printed


I hope to see your creations in the gallery this week!

*************************************
Linking up to:
Crafty Catz - ATG w/option Spots and Stripes
A Place to Start - ATG option
Addicted to Stamps and More - Die Cuts and/or Stencils


Sunday, September 24, 2023

Ghastly Ghost

Hello there!
Today I'm sharing a simple design card featuring a digi from
This is a new collection from

You'll find a multitude of cute ghost images perfect for your Halloween crafting.


 I colored this fun digi with Prismacolor Pencils and fussy cut before
adding to a simple white background.
The sentiment was printed directly on the white card stock and 
The patterned paper used is from the
I added a strip along the bottom and fussy cut the border on the right.

Thanks for taking look and I hope you check these items out!

_________________________________________________
Linking up to:

Friday, September 22, 2023

Pumpkin Emily

Happy Friday!
Hey, have you seen the newest digi from

This is Pumpkin Emily  and she sure is a cutie, don't you think?


The image was colored with Prismacolor Pencils and fussy cut.
I popped her with foam tape onto a black background.
I added some dots of silver metallic marker on the black to give a "star" appearance.
The tree silhouette was die cut.
The "Happy Halloween" sign is a die cut from my stash.
I added 3 glitter dots to the lower right corner.

I hope you'll join us over on Facebook at

You'll find lots of inspiration there and we welcome you to share your
creations using Conie Fong products!

Thanks for stopping by and have a great weekend!

***************************************************
Linking up to:
Unicorn Challenge - Layer it Up
Pearly Sparkles Challenge - Use Pink, Pearls and/or Sparkles

_______________________________


Top Pick

Top 3


Thursday, September 21, 2023

Stack of Jacks

Happy Thursday!
Today I am sharing 2 cards created for


They were created with one of this month's new digital stamp sets.


When you purchase this digital set, you will receive a zip file containing:
- 3 black and white line drawings
- 3 full colour images
- 5 word images / sentiments


I colored the images on both cards with Prismacolor Pencils.
They were fussy cut and added to backgrounds of patterned paper from Recollections. 
The sentiments on both cards are included in the set.
They were printed on white card stock and added.
Pretty simple designs, but i didn't think anything else needed to be added.
These pumpkins are fabulous  on their own!

Check out these fun digis and all the other products available in store!
And there is always plenty of inspiration and a challenge found at the
___________________________________
________________________________________________


Fall Door Decor

Fall is in the air, don’t you think? And, I love the fall season! The cooler weather, leaves changing and pumpkin spice are all so nice.


Hey there! Today I'm here with a fall door decor project created for CutCardStock. You can be sure to find a wide variety of card stocks in lovely fall colors there that are perfect for all your crafting.


My project was started by choosing some brown and orange card stocks, which are on sale this month.

DCS Discount Card Stock: Textured Flame Tree Orange Card Stock

Pop Tone HOT FUDGE 8.5×11 Discount Card Stock

Pop Tone ORANGE FIZZ 8.5×11 Discount Card Stock

KRAFT CHIPBOARD .022 for all your crafting needs – 25 pack


I created 4 rosettes with 4 layers and die cut letters spelling fall, which were added to a length of burlap ribbon.

Create the larger rosettes for the bases of each by cutting 3 strips of card stock measuring 3 x 11 inches. I punched a border on each strip, but they can be left plain if desired.


Each strip was scored every 1/2 inch and accordion folded. I used double sided red line tape to adhere 3 strips together to form a circle. Squeeze the inside edge of the circles together and hot glue 1 1/2 inch die cut circles to the center top and bottom of each piece. My rosettes measure approximately 5 1/2 inches.


I die cut 4 pieces of the Kraft Chipboard with a scallop die measuring 4 inches.

4 more rosettes are made by cutting 3 strips of 8 1/2 inch x 1 1/2 inch strips of card stock. These are put together the same as the larger ones. I used 1 inch die cut circles to secure the centers.

Banner shapes were die cut for each rosette. Letters spelling “FALL” were die cut out of a scrap piece of  Royal Sundance FELT Brilliant White 8.5×11 Card Stock.


With all my components complete, I’m ready to assemble.


Each rosette piece was layered and hot glued together as seen in the photo below.

The burlap ribbon was cut approximately 28 inches. I folded the top over to form a loop and ran a piece of wire through to act as a hanger. Hot glue the rosettes down the length of ribbon, spacing evenly.


Thanks for taking a look at my project. I hope I’ve inspired you to try a fall project.

As always, we would love for you to connect with us over on the CutCardStock Facebook Page and the Facebook Group Creating with Card Stock for more inspiration.

__________________________________________

Linking up to:
Try it on Tuesday - Going Round in Circles
Unicorn Challenge - Layer it Up
Inspiration Station - prompt photo (fall colors inspired me)


Wednesday, September 20, 2023

Halloween Tag

Happy Wednesday!
I hope all are doing well.

Today I'm posting for Polkadoodles
I've created a tag using a new digi from the


I colored the cute witch cat with Prismacolor pencils and fussy cut.
The patterned paper used is from
I die cut 3 stars to coordinate with the paper.
The sentiment was printed from 
Ribbons were added.

Thanks for stopping by and have a great day!

*******************************************
Linking up to:
Aud Sentiments Challenge - Tag It + Sentiment

Saturday, September 16, 2023

Best Witches

Hello and Happy Saturday!
It's time for a new

This week the DT was asked to incorporate Halloween icons into our projects.
I added bats, a jack-o-lantern and a black cat.

 My card was created with the Grab Your Broomstick Matchables Stamp and Die Set
I colored the images with Spectrum Noir Markers. 
The background was done by watercoloring with Spectrum Noir Sparkle Pens. 
The sentiment was stamped and die cut.

Won't you join us this week?
The theme for entering is
ANYTHING GOES.
And you'll be legible to win a great prize!

Hope to see you there!


Thursday, September 14, 2023

Broomstick Emily Witch

 Hi there!
I'm popping in this afternoon to share a card created for

This card uses a cute new digi called


I colored the image with Castle Arts Soft Touch Pencils and fussy cut.
My white background was embossed with an embossing folder.
I created a border and added die cut banners.
The scalloped frame was also die cut.
I added stickers for the "BOO" sentiment and little flower button.

I hope you'll join us over on Facebook at

You'll find lots of inspiration there and we welcome you to share your
creations using Conie Fong products!

Thanks for stopping by and have a great weekend!

*****************************************************
Linking up to:
Unicorn Challenge - Layer it Up


Wednesday, September 13, 2023

Perfectly Wicked

There's some new Halloween printables out over at

I'm sharing a card created with the set called

Colored up this cutie with pencils, fussy cut and popped
with foam tape onto a die cut and layered frame.
I used a patterned paper from Eyes on You 6 x 6 paper.
The spider web was printed from the
My sentiment is from Boo Halloween Sentiment Bundle.

So, if you like Halloween and Fall crafting check out the new printable bundles at

*****************************************
Linking up to:
Unicorn Challenge - Layer it Up


Signs of Fall

Hello there!
It's the second Wednesday of the month and
that always brings a new challenge at

The theme for this challenge is: 

~ Signs of Fall ~

Our sole sponsor for this challenge is  

Prize ~  $10 Gift Certificate
____________________________________

My DT card features the Pumpkin & Spice digital stamp set.


I colored the image used with Prismacolor Pencils and cut using a circle die.
One of the sentiments included in the digi set was
printed on white card stock and adhered to the card base.
A piece of patterned card stock was cut to a triangular shape and
added to the right side of the card. I added a border strip
I cut three small pieces of coordinating card stock, added to the card and 
adhered the image over to complete my design.

Won't you join us this month with your fall creation?

**********************************************************************
Linking up to:
Unicorn Challenge - Layer it Up
Inspiration Station - Inspired by Pumkins and Fall Colors

Thursday, September 7, 2023

'Tis the Season

Hi there!
Are we working on Holiday/Christmas cards yet?
'Tis the Season, right?

Polkadoodles has a great new collection if you are
looking for ideas and inspiration.


This collection is packed full of printables that includes everything you need.
And you can purchase the whole collection or bits and pieces at
40% off with code BX40.

My card was created with one of the pre-colored digis


I used one of the papers and sentiments from the collection.

The pre-colored digit was printed and fussy cut.
I printed and fussy cut trees from the
The sentiment was printed on white cardstock and
added as a panel on the bottom of my card over the
printed patterned paper background.
The trees and bear were adhered with doubled sided tape and foam tape.

Thanks for stopping by and have a great weekend ahead!

_____________________________________________________
Linking up to:

Christmas with the Cuties - Something Snowy
Crafty Animals - ATG w/animals
Critter Crazy Challenges - ATG w/featured critter
Peace on Earth Christmas Challenge - ATG Christmas themed


Wednesday, September 6, 2023

Gift Bag, Tag and Card Set

I like dressing up plain gift bags and making coordinating tags and cards! It makes for an extra special way to present gifts, don’t you think?

Hey there! Today I'm sharing my latest DT project for CutCardStock.

My set was created with a bag I had sitting around the house, fabulous card stocks, stamps, dies and a little coloring.


Getting Started

Start by choosing what you would like to use as focals and coordinating card stock.

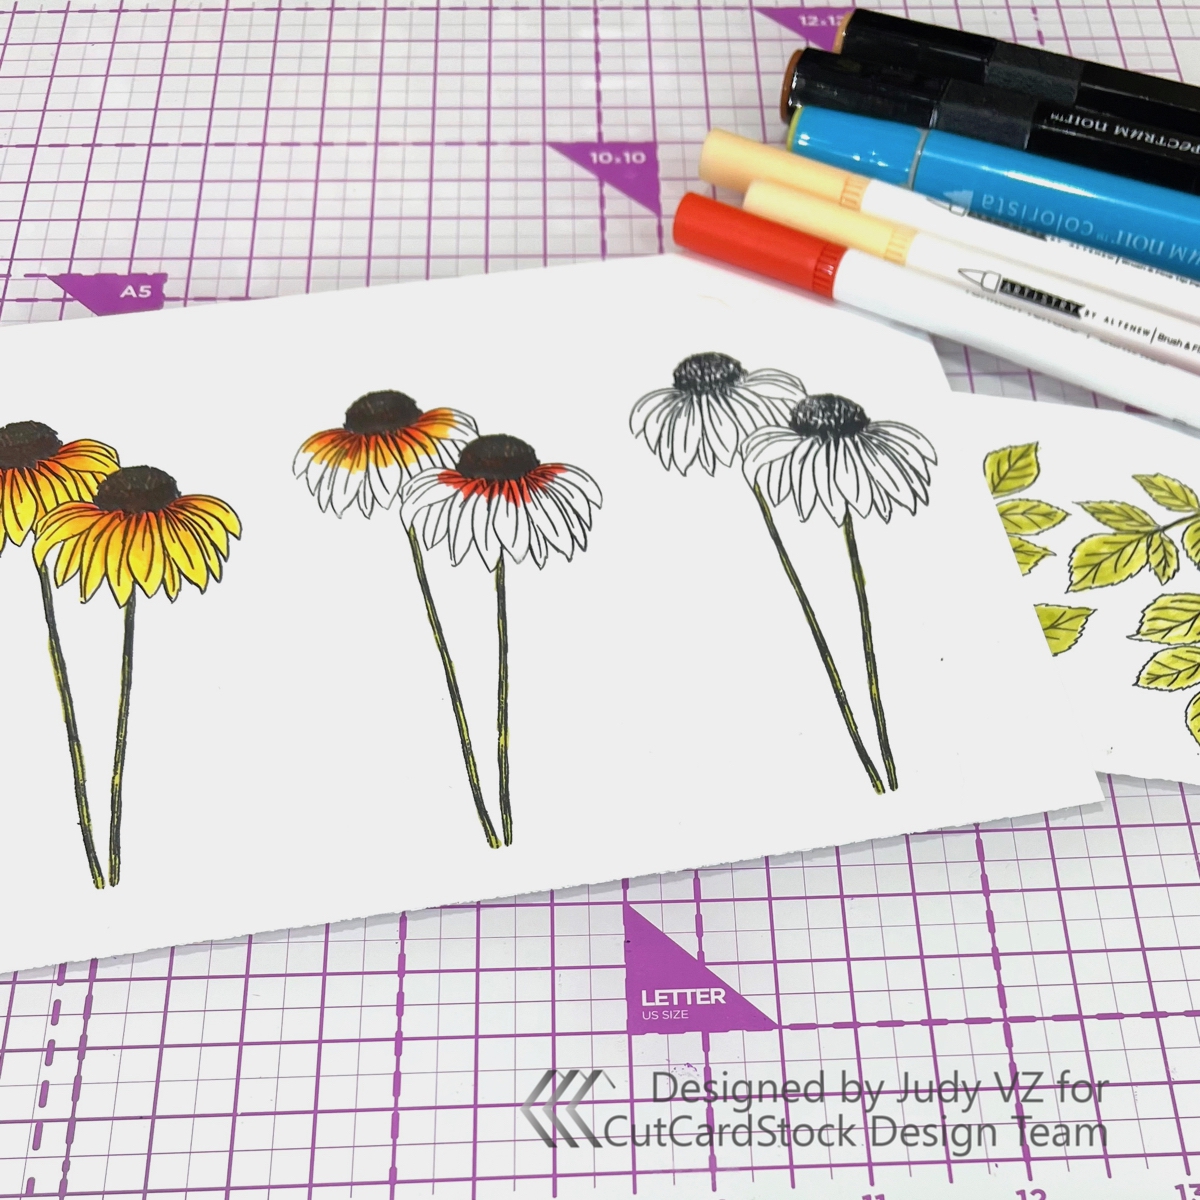
I chose a stamp set with coneflowers from Crafter’s Companion and black ink.

Cougar White Smooth CardStock

Stardream Metallic GOLD 105 lb Cardstock

DCS Discount Black Card Stock

A purchased plain black gift bag


Flowers and leaves were stamped onto the white card stock and colored with various markers.


Base Pieces

Next, I cut my card stock pieces. 

For the bag gold was cut to 6 x 6 inches, black 5 x 5 inches, white 4 7/8 x 4 7/8 inches.

A 5 x 6 1/2 inch black card base was created by folding a 10 x 6 1/2 inch piece of card stock in half along the 10 inch side. Gold was cut to 4 1/2 x 6 inches. Cut a piece of black to 4 x 5 1/2 inches and white to 3 7/8 x 5 3/8 inches.

The tag is comprised of a gold base 2 1/2 inches wide and 4 1/2 inches long. I punched the top edge with a tag punch and rounded the lower corners. A piece of white was cut 2 1/2 x 3 inches. Two pieces of black were cut to 2 1/2 x 1/2 inches.


Adhere the pieces for the bag, card and tag as shown in photo below.


Finishing Up

Die cut sentiments for each of the three pieces. Fussy cut the flowers and leaves.


Adhere the flowers and leaves to each piece.


Complete by adding sentiments and any other items to embellish. I stamped dragonflies to the bag piece and added gems to the card.

Adhere the base pieces to the bag and card. Attach the tag to the bag with twine.


I hope you have enjoyed my gift bag, tag and card set and provided a little inspiration.

As always, we would love for you to connect with us over on the CutCardStock Facebook Page and the Facebook Group Creating with Card Stock for more inspiration. 
Also check out the CutCardStock Creative Blog!

*********************************************************
Linking up to:
Dragonfly Dreams - Happy Birthday
Stamping Sensations - Garden Delights
Allsorts Challenge - ATG or Sunflowers