Hey there!
When you have a gift for someone do you prefer wrapping it or using a gift bag?
If you are like me a gift is the way to go!
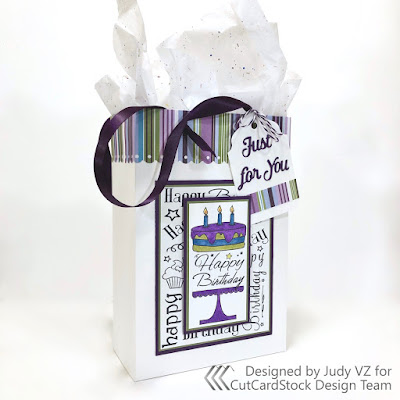
Today I'm sharing a gift bag and tag project over on the
You can easily create these and have an extra special way to present your gift!
I made mine for a birthday gift, but you can adapt for any occasion.
This is one of the White and Ivory Card Stocks on special this month.
I am using a patterned paper from my stash and
chose 2 card stocks to coordinate,
To construct a 9 x 6 x 3 inch bag, start with two 12 x 12 pieces of card stock.
Score on 3 sides of both pieces at 3 inches.
Next I cut from the outside edge along the horizontal score line to the vertical lines on one piece.
On the second piece cut to remove the outside squares on the bottom.
I want to add a decorative edge to the top of the bag.
This is done by cutting 2 strips of patterned paper 2 x 12 inches.
Score at 1 inch along the long side of each strip.
Just a note that it is easier to use a patterned paper versus a card stock.
The score line goes over the top edge with 2 inches along the outside and 1 inch on the inside.
Now it is time to form the bag by adhering the 2 pieces together.
This is done by taking the piece with the 2 squares removed and
adhering the 3 x 6 inch flap onto the center of the other piece between the score lines.
Next fold up the piece just adhered and attach the 2 small flaps to the sides along the inside.
Fold up the other piece and attach both on the outside edges to form the bag.
I punched 2 holes on the front and back about 1 1/2 inches in from both sides and
about 5/8 of an inch from the top.
I ran ribbon cut to 18 inches through he holes and tied knots.
This form the handles. I tied my knots on the outside.
You can tie them on the inside if preferred.
The construction of the bag is complete.
You can leave it plain or embellish it!
I prefer to add a little something to mine to dress it up.
My embellishment piece was created with black ink,
2 stamps, Basis White Card Stock, Olive Card Stock, Plum Card and markers.
A tag is a nice touch to a gift bag.
I cut a 4 x 2 1/2 inch piece of Basis White Card Stock.
A tag punch was used on the upper edge.
The corners were rounded. A strip of patterned paper was added to the lower edge.
I die cut Just for You out of Plum Card Stock.
Just add your gift and a little tissue paper and you are ready to go!
Although my bag measures 9 x 6 x 3 inches you can
adapt the size of card stock to adjust your size.
I'm linking up to:
A Bit More Time to Craft - ATG
A Perfect Time to Craft - ATG
Classic Design Challenge - ATG


Hi Judy this is a gorgeous gift bag. Take care. Hugs Jackie
ReplyDeleteHi Judy I am back again this time to thank you for joining us at Crafts Galore Encore Challenge Blog for challenge #90 which has the theme Anything Goes. The sponsor is Beccy’s Place. Hugs Jackie DT xxx
ReplyDelete