Friday, May 30, 2025
Mermaid Birthday Wishes
Thursday, May 29, 2025
Summer Softball
My younger sister played summer softball when she was about 14 or 15. I haven't thought much about it until I pulled out some supplies to make a card. Funny how some things trigger memories of many years ago! Don't you think?
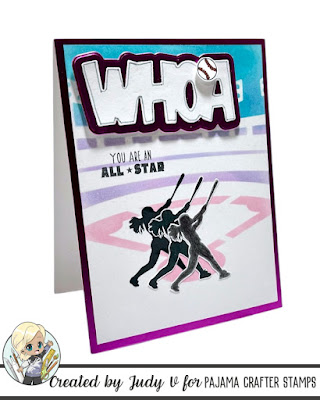
Hey, it's Judy V here with a card project for Pajama Crafter Stamps with Play Ball Stamps, the Legends Born Stencil andDang Whoa Yikes Word and Shadow Dies.
I went with a pretty simple card design this time around to create this A2 size top folding card.
Use ink to add color to the 4 x 5 1/4 inch white background panel with the stencil.
I stamped the girl batter directly onto the stenciled card panel with black ink. Stamp the girl batter 2 more times using a lighter black and a dark gray ink.Fussy cut before adhering in a staggered fashion to give the illusion of hitting the ball and follow through!
Die cut the word "WHOA" with white card stock. I die cut the shadow with a matte metallic card stock. Layer the word and shadow die cuts. Add an outline to the word with a glitter gel pen.
I stamped the "You're an All-Star" sentiment directly onto the background.
Adhere matte metallic card stock to the card base. Layer the background panel onto the base. Pop the "Whoa" die cut with foam tape.
I decided to stamp the ball, fussy cut and add to the word die cut.
Oh, how I enjoyed putting this card together and thinking of those summer softball memories!
Monday, May 26, 2025
Spring House Memory-Dex Box
Hi there! Judy here with a spring themed memory-dex box project created for Clear Scraps.
Clear Scraps has many Memory-Dex Boxes available. I am using the House Memory-Dex Box the new Spring Chipboard Embellishments.
I start by painting the 3 fence pieces with white acrylic paint.
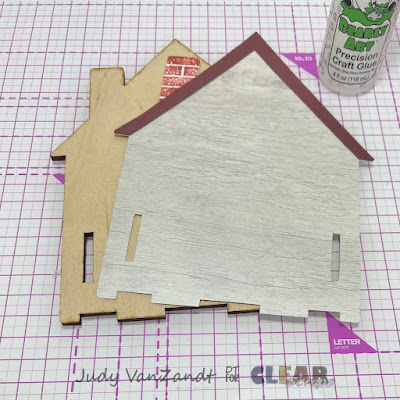
A patterned paper will cover the backside of the house piece.
Trace the house onto the back of the patterned paper and adhere. I used a brick pattern embossing folder to emboss a piece of white card stock for the chimney. Dark red ink was added. I cut a piece of burgundy card stock to mimic eaves along the top edge.
Adhere
I cut out and added another piece of patterned paper for the other side of the house piece.
Green card stock is applied to the box bottom piece.
Assemble the box
I cut some grass piece with a die
Paint the Spring chipboard pieces
Add the grass and chipboard pieces. I fussy cut some flower clip art to add as well.
I added a die cut window and some hand punched butterflies.
The box is complete.
Thanks so much for stopping by. I hope I’ve provided some inspiration for your crafting.
Be sure and check out more Clear Scraps inspiration
by following on social media
Saturday, May 24, 2025
Yellow Themed Card
Friday, May 23, 2025
New Buzzy Bee Gnomes at Polkadoodles
Saturday, May 17, 2025
Pajama Crafter Stamps Father's Day
Friday, May 16, 2025
Grad Wave Pop Up Card
Do you know anyone graduating from high school or college this month? If so, I have a card idea to offer up that is a little different than a regular card. Hi there! It’s Judy here with a Wave Pop Up Card project for CutCardStock.
Maybe you are familiar with this card style but, I just recently saw some on Pinterest and had to try one.
Materials
I am using 3 colors of Lessebo Card Stock for my card.
Lessebo NAVY BLUE Cardstock, Lessebo SALT WATER BLUE Cardstock, Lessebo WHITE Discount Cardstock
Also using some pattern papers, dies, adhesives, score board and bone folder, paper trimmer.
Wave Pop Up Card Base
Start by creating a card base. You can go with any size card base, but I am going with 4 1/4 x 5 1/2 inch size.
Cut a piece of Lessebo NAVY BLUE Cardstock to 4 1/4 x 11 inches and 3 pieces of Lessebo WHITE Discount Cardstock to 4 x 5 inches.
Score at 5 1/4 & 5 3/4 inches along the 11 inch side. Fold and burnish along the score lines. 2 score lines are necessary as the inside of the card is a little bulky.
Adhere the white pieces of card stock to the front and inside of the card base.
Cut 3 pieces of pattern paper for card.
Adhere a rectangular piece to the card front.
Cut 2 pieces diagonally for inside of the card and adhere.
Create the “Wave” Pop Up Card Pieces
It’s time to create and add the “wave” pieces.
The first step is to cut a piece of Lessebo WHITE Discount Cardstock to 6 x 7 3/4 inches. Score this piece of card stock at 3, 3 3/4, 4 1/2 & 7 1/2 inches along the 7 3/4 inch side.
Cut 6, 1 inch strips along the 6 inch side. Fold and burnish on the score lines to form an “M” shape as in 2nd photo below.
Glue the 1/4 inch end to the inside edge of the other end as in 3rd photo below.
Begin adding the “wave” pieces to the inside of the card. To do this, adhere 1 piece to the right side just below the bottom score line. The part that forms an “M” will face toward the bottom of the card as in photos below.
Continue by adding the next 5 pieces stacking on top of the left side of each piece overlapping about a 1/4 inch.
Once you adhere all 6 “wave” pieces, glue the last piece on the far left side just above the uppermost score line. So, attach the top of the last piece to the upper flap of the card.
The inside of the open card should look like this photo.
Decorative Pieces
Die cut pieces to decorate the card. I die cut a large sentiment piece and circle that will go on the card front. Cut 6 elements to go on the “waves”. I am using graduate silhouette die cuts.
Use Lessebo NAVY BLUE Cardstock and Lessebo SALT WATER BLUE Cardstock for the die cut pieces.
I also die cut a “Congratulations” sentiment out of the Navy card stock not pictured here.
Finishing
Adhere the “You Did It” sentiment piece to the die cut circle.
My Grad Wave Pop Up Card is complete and I will definitely be making more cards in this style. It, of course, can be adapted for any theme and/or occasion.
Thanks for taking the time to check out this card project. I hope you give this type of card a try for yourself.
Join us over on the CutCardStock Facebook Page and the newly revamped Facebook Group Creating with CutCardStock for more inspiration.
And even more inspiration can be found on the CutCardStock Creative Blog.


.jpeg)


