Thursday, June 27, 2024

Twisted Easel Wedding Card

I have always heard that June is the most popular month for weddings. Is that really so? I’m not sure but I do like to have a wedding card or two on hand just in case someone is in need of one.


Hey there, I'm here today with my latest CutCardStock project. This is a Twisted Easel Wedding Card made with card stocks that are part of June’s Monthly Specials.


If you have not made a twisted easel card before it is not that difficult. It is just a little different version of a regular easel card. 


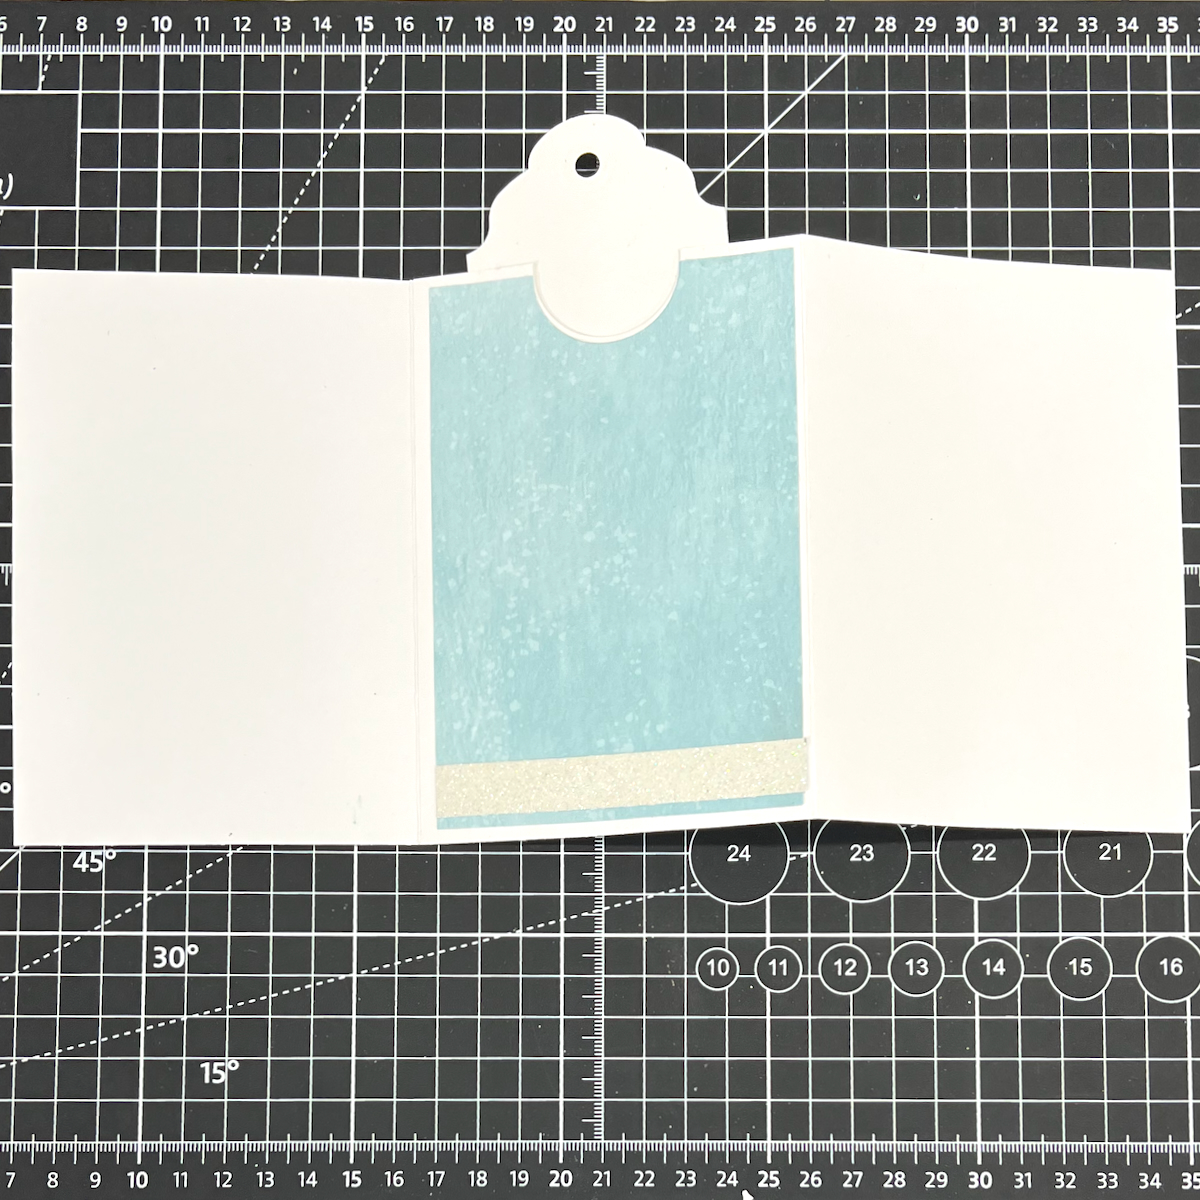
First, cut a 5 1/2 x 5 1/2 inch card base. This is done with a 5 1/2 x 11 inch piece of Mohawk Super Fine White Smooth 100 lb CardStock. Score at 5 1/2 inches along the 11 inch side. In order to create the “twist” in this card base, you’ll need to make one additional score line. Do this diagonally from the top left hand corner down to the right where the center score line is. The center fold of the card should be on the left side.


With the card base done, we’re ready to decorate.


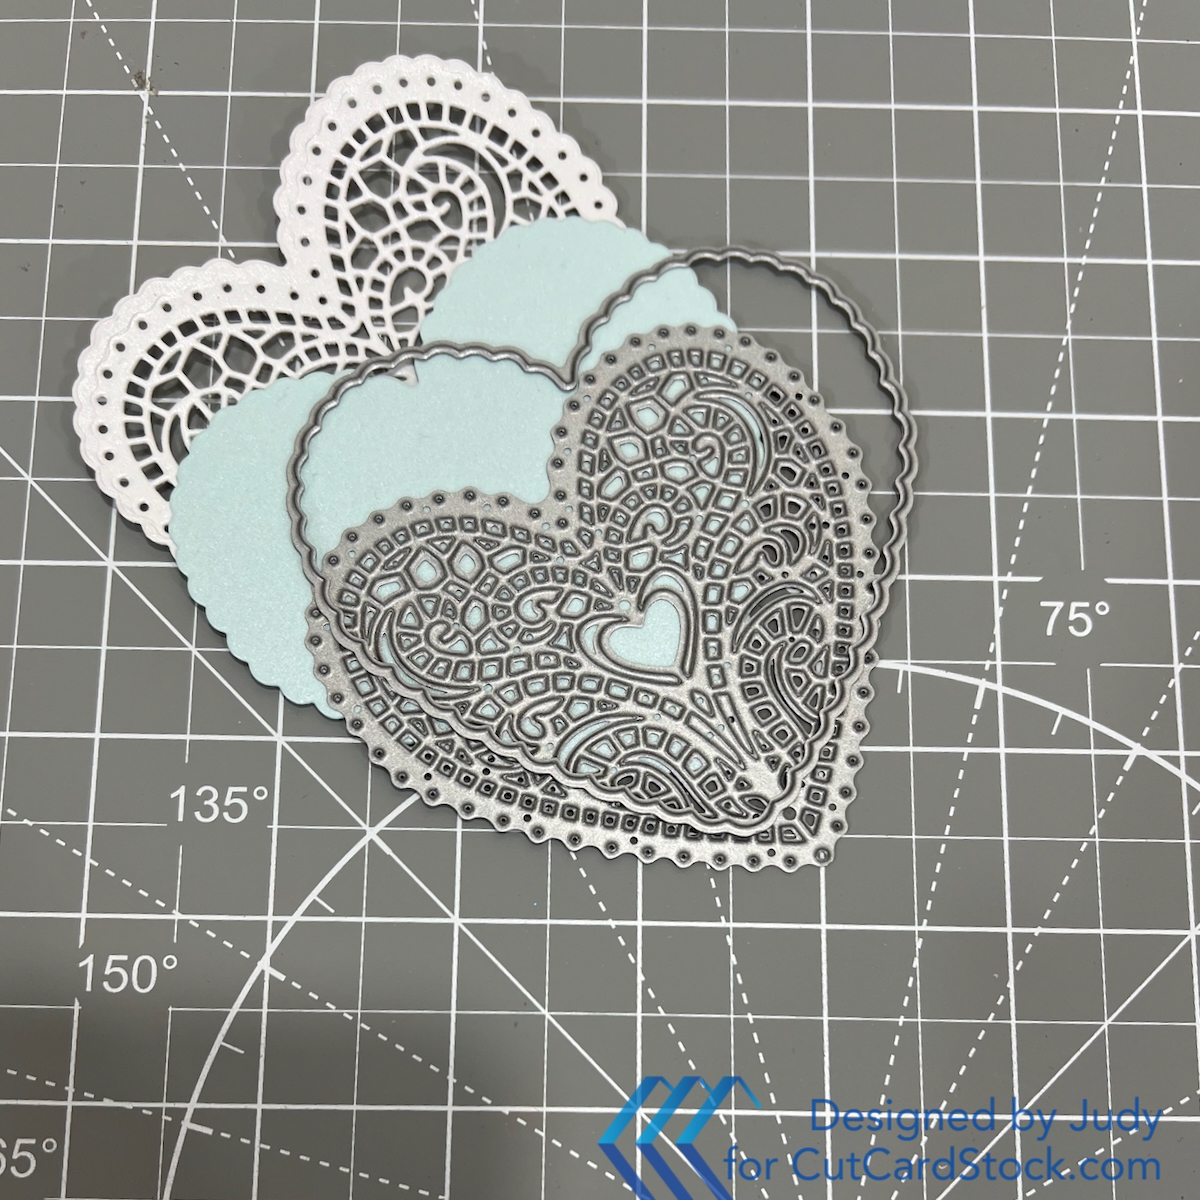
I used a create-a-card die from Crafter’s Companion detailing a frame of trees surrounding a bride and groom. Alternatively, a regular square, circle or another shape you like can be used as a frame. You can add a die cut couple, stamped couple or a digital stamp of a couple. 


Stardream Metallic CRYSTAL (white) 105 lb Card Stock was my choice for the frame. Next, I adhered this to Stardream Metallic AQUAMARINE 105lb Card Stock.


I cut the background piece down to 5 x 5 inches. Similarly, I cut a piece of Aquamarine Stardream Metallic Card down to 5 x 5 inches for the inside of the card. 


Adhere the card front panel to the lower half of the card base and the plain aquamarine panel to the inside.


Additionally, a “stopper” is placed on the bottom of the card to hold it open in an easel position. I used a couple heart dies. Also added a die cut sentiment cut from Crystal and Aquamarine Stardream Metallic Card Stocks.


Layer the hearts and sentiment, adding foam tape to the back of the completed heart. A double layer of foam tape on the top and a single piece on the bottom gives good dimension.


Adhere the heart to the inside of the card with pearls on the inside border for a little more embellishment. Now the card is complete.


Thanks so much for taking the time to view my Twisted Easel Wedding Card. If you’ve not made a card in this style before, I hope I have inspired you to do so.


Be sure to connect with us over on the CutCardStock Facebook Page. Also join us in the Facebook Group Creating with Card Stock for more inspiration.


And even more inspiration can be found on the CutCardStock Blog


Get Whale Soon

 Hello there!
I'm sharing one of my DT projects for this month for

This card was created using a new release stamp set.

The 4 x 6 inch clear stamp set includes 6 image stamps and 5 sentiment stamps.


I used 3 of the image stamps and 2 of the sentiments.
The images were colored with alcohol markers and fussy cut.
My "under the sea" background was done with a blue texture look paper that
I tore into strips and layered. Two die cuts which were cut out of white card stock
were colored with glitter gel pens.

We would love for you to connect with us in the

You can find more Pajama Crafter Stamps inspiration from 
other design team members and are welcome to post your creations
 using Pajama Crafter Stamps products.

Also follow on Instagram @pajamacrafterstamps.

Thanks for stoping by and have a great day!
___________________________________________
Linking up to:
Krafty Chicks Challenge - All Occasions


613 Avenue Create - ATG/For the Guys Twist


Saturday, June 22, 2024

Be Happy

Happy Saturday!
I've totally lost track of time!

I'm a little late posting for this week's

Challenge theme:
ANYTHING GOES


The DT was asked to create an interactive card for this week's challenge.
We were also asked to use pink and green as our color combo.
I chose to do a twisted easel card.
My focal for the front of the card is one of the pre-colored images from the
Pretty Flower Wreath Digi Deal. Also used 2 of the patterned papers and a sentiment
from this set on the inside of the card.
I fussy cut the wreath and popped onto a white circle die cut.
I stamped a border on the front.


Pop over, check out the challenge and show us your crafting project!

*******************************************
Linking up to:
Creative Creases - ATG with a fun fold
Creative Knockouts - Fun  Fold
Classic Design Challenge - ATG w/Fancy Fold Twist
Creatalicious Challenges - ATG optional Pastel Colors

Thursday, June 20, 2024

Mermaid Flash Card

 Hi there!
Today I am posting my latest DT project for

I am using one of the new Beach Retreat Flash Cards.

Pajama Crafter Flash Cards are a crafters best friend! 
Flash Cards can be used as is, you can ink blend on them, 
you can foil them with a laser-toner compatible laminator & foils
 and even just stamp and embellish them!


I took one of the cards, trimmed it down a bit and did some inking.
A die cut frame was placed behind the card.
The Prickley Pear Coffee Cup Die Set was used for embellishment.
I cut one of the dies out of white card stock and 
added a piece of blue metallic card stock to the center with 
a fussy cut shell from the patterned paper I used. 
A die cut mermaid was added.
I also added a few Girl's Best Friend Rhinestones.
A little washi tape was added below the 
die cut frame abovethe patterned paper.

We would love for you to connect with us in the

You can find more Pajama Crafter Stamps inspiration from 
other design team members and are welcome to post your creations
 using Pajama Crafter Stamps products.

Also follow on Instagram @pajamacrafterstamps.

____________________________________
Linking up to:

Cut it Up Challenge - Feeling Blue
A Place to Start - ATG option
613 Avenue Create - ATG option

Monday, June 17, 2024

First Kiss

Hello there!
I wanted to pop on this afternoon to share a card created for

Conie's digis are absolutely favorites of mine to color.
I colored up this sweet digi last night and just had to add it to a card.


The images was colored with Prismacolor Pencils and fussy cut.
I die cut and and added color by inking to a frame.
The background wasminked as well.
A pretty patterned paper with a lacy border 
was added to my 5 1/2 x 8 1/2 inch card base.
The sentiment was die cut and added to die cut labels.
I added pearls to complete my design.

I do hope you'll check this digi out along with all the other
fabulous digis available in Conie's Etsy Shop.

Also, I hope you'll join us over on Facebook at
You'll find a new challenge up there for the rest of June and July.
We'd love to see your creations using Conie Fong digis there!

___________________________________________
If you would like to draw your own more simple version of a mermaid
________________________________________________

Conie Fong now has a You Tube Channel where she teaches drawing simple images 
in easy step-by-step drawing tutorials.


Also, we invite you to join the Draw with Conie Facebook Group.
You'll find info on new videos there and inspiration projects from the Design Team. 

**************************************************
Linking up to:
The Four Seasons Challenge - Anything Summer Goes
613 Avenue Create - ATG option
A Place to Start - ATG option
_________________________________________
Challenge Recognition


Friday, June 14, 2024

Oh Whale

Happy Friday!
It's time for this month's InstaHop for


And it is also New Release Day!


*******************************************************


My card was created with the new Oh Whale Stamp Set and

Prickley Pear Sketched Florals Wisteria Stamp.

I started by stamping the wisteria stamp on watercolor card stock.

It was watercolored with Tombow Dual Brush Pens and fussy cut.

The card background was watercolored with Spectrum Noir Sparkle Pens.

I stamped the whale and sentiment and then popped the floral piece with foam tape

onto the background and matted with white card stock.

This piece was added to the card base which is covered with black card stock.

Pearls Night Out embellishments were added to complete my card design!

___________________________________________________

Welcome to our June Inspiration Hop at Pajama Crafter Stamps! This month the team is makin’ waves with a brand new super awesome oceanic June release! We hope you will join us and have some summer fun!


GIVEAWAY:

1. Leave a comment and a like at each hop stop for a chance to win one of TWO $10 store vouchers from Pajama Crafter Stamps! Vouchers must be used by July 30, 2024.

2. Follow me and @pajamacrafterstamps.

3. Two winners will be chosen randomly from all comments left by June 19 at 11:59PM EDT. The winners will be announced on the Pajama Crafter Stamps Instagram and Facebook on June 21st.


This hop is in no way sponsored, administered, or associated with Instagram or Facebook. By entering, entrants confirm they are 13+ years of age, release Instagram and Facebook of responsibility, and agree to their terms of use.


Head on over to Instagram and get started with the Hop!


Hop order:

@pajamacrafterstamps 

@joywilsonink

@joy_in_a_jar

@743linda

@createdjust4udesigns

@lyntomlin

@sejrandersen

@rickadkinsdesigns

@beckyharrisoncards

@stationarybyjustine

@stamparuecreations

@sglass1908

____________________________________

Linking up to:

Craft Rocket Challenges - No Design Paper

A Place to Start - ATG

Dream Valley Challenges - Summer Colors

A Perfect Time to Craft Open Challenge - ATG

Crafty Animals - ATG w/animals

Love to Craft Challenge - ATG

Love to Scrap Challenge - ATG

613 Avenue Create - ATG w/For the Guys twist

Lil Patch of Crafty Friends - ATG

Creative Fingers Challenge - ATG

___________________________________________

Challenge Recognition


Thursday, June 13, 2024

Fairy Album/Journal

 Hi there!
Today I'm sharing my final project as a Creative Guest Team Member for Clear Scraps


I pulled out the Chipboard 5x7 Tab Album and Heart Mini Pallet Shape. The Album comes with 4 chipboard pages and 2 pre-drilled holes. Heart Mini Pallet measures approximately 3.75 x 3.75 inches, is made from 1/8 inch birch wood and is hand assembled. It can be used as a great addition to any craft project, is unfinished and ready to decorate as you please.


So, what should I do with these products? Well, I remembered I had purchased some digital Garden Fairy Clip Art on Etsy from ThursdayPrintsMY a while back and decided a little fairy themed album and/or journal would be a fun project to create! 


I pulled out a 12x12 inch paper pad to use and chose 7 fairies, that I thought coordinated well with the patterned papers, and printed.


The fairy images were fussy cut.


Next I painted the 4 chipboard album pages and the heart with a light blue metallic acrylic paint. I’ll be covering the chipboard pages with paper so I only painted around the outside edges of both sides. 


Cover each side of the chipboard album pages with the papers measuring 4 1/2x6 3/4 inches. I lined my papers up on the chipboard and marked where the holes are and punched. (later I ended up punching a total of 6 holes on each page with my Cinch machine)


The papers I used for the front and back covers are mostly white with some foiling, so I added a little ink for some color with a finger dauber.


I decided to add some more pages to the album. Magical Garden Clip Art from CosmicMeta on Etsy was downloaded and printed on white card stock and trimmed to 4 1/2x6 3/4 inches.


Holes were punched.


Wanting to add some pockets, I cut 6 pieces of patterned paper 4 1/2 inches wide and 3 1/2 inches long on one side and 1 3/4 inches long on the other in order to form a diagonal piece.These will be adhered to the bottom and outside edges of the pages.   


I also decided to add some trifold pieces to the inside front and back covers. 


These were formed with 2 pieces of white card stock cut to 7 1/2 x 5 1/2 inches. Score at 

3 3/4 inches along the 7 1/2 inch side of both pieces. Adhere 1 side of each together along the sides and bottom, leaving the top open to form a pocket for a tag. Fold with a mountain fold on one side and valley fold on the other. I notched the center panel with a round die or you could use a circle punch. This makes it easy to insert and remove my tags which 

measure 2 1/2 x 4 1/2 inches. 


Decorate the chipboard pages and printed pages as desired. 


I die cut frames and word titles and pulled out an array of stickers and bling. A little bit of foiling was done with transfers and I added some wavy borders on the plain pages with a glitter gel pen.


Binder rings are used to hold the album together. I added some ribbon and a charm.


Some journaling cards were inserted in the pockets.


Here are photos of the completed pages.


Thanks so much for taking the time to check out my project!


You can find more Clear Scraps inspiration 

by following on social media


Clear Scraps Blog

Clear Scraps Facebook

Clear Scraps Instagram

______________________________________________________
Linking up to:
A Place to Start - ATG w/Anything but a Card Twist
Mini Album Mania - Any Type Mini Album
613 Avenue Create - ATG option
HQFCB - ATG Fantasy / Focus Fairy
_____________________________________________
Challenge Recognition