Tuesday, July 30, 2024

Candy Cane Dog

Hello there!
Sharing a quick and easy card created for

And, it's for Christmas in July using


I love this little cutie!
He is colored up with Prismacolor Pencils.
I fussy cut before popping him with foam tape
onto this patterned paper background.
The sentiment was on the paper I used and so was the
banner, which I fussy cut and added to the top with some red pearls.
2 little dimensional candy cane stickers complete the design!

____________________________________________

Would you like to learn how to draw this cute dog for yourself?
You can!

Conie Fong now has a You Tube Channel where she teaches drawing simple images 
in easy step-by-step drawing tutorials.


***************************************************
Linking up to:
The Holly and Ivy Christmas Challenge - Anything Christmas Goes
Dream Valley Challenges - Christmas  in July
613 Avenue Create - ATG option
Dragonfly Dreams - Christmas in July
Krafty Chicks - All Occasions
Merry Little Christmas Challenge - Anything Christmas Goes

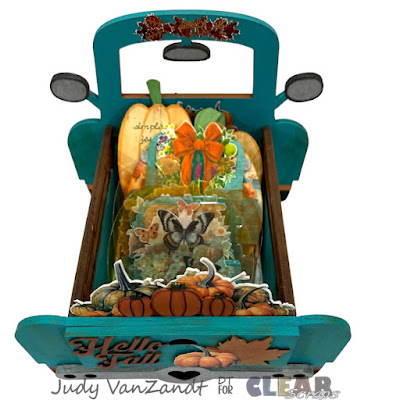
Fall Memory-Dex Dividers

Hi there! It’s Judy here with a quick and easy Clear Scraps project.


I recently posted a project for a fall themed 

Vintage Truck Memeory-Dex Box. 


Today I am sharing decorative fall themed dividers that 

will go perfectly with it or they can be used in a rolodex.


A set of Harvest Chip Memory-Dex Dividers and 

a set of Harvest Acrylic Memory-Dex Dividers were used.


For the Chipboard dividers I used a combination of metallic markers, 

fall themed printable papers, clip art and stickers were used.


The truck divider was colored with metallic markers on both sides. I added a clip art wreath to the front side. A gold sticker sentiment was added.


I added printable papers and clip art to the front of the 2 pumpkins shaped dividers. The backside of each was colored with metallic markers. Gold sentiment stickers were added.


The Acrylic Memory-Dex Dividers were colored with alcohol markers. I added clip art printed on vellum to decorate.


Thanks for taking a look at today’s Memory-Dex Dividers project.


You can find more Clear Scraps inspiration 

by following on social media


Clear Scraps Blog

Clear Scraps Facebook

Clear Scraps Instagram

Clear Scraps Pinterest 


Thursday, July 25, 2024

Table Top Games

Today I am sharing 2 cards created for


These cards feature a new digital stamp set for this month


When you purchase this digital set, you will receive a zip file containing:
- 3 black and white line drawings
- 3 full colour images
- 5 word images / sentiments
___________________________________________________

My card designs are really simple this time around.
The images were colored with Prismacolor Pencils and fussy cut.
I added them to plain white backgrounds with 
a little bit of stamping done with "grunge" type stamps.

The sentiments were printed onto the white backgrounds
before I did the stamping and added the images.


Check this digital stamp set out along with all the other products in store from

And there is always plenty of inspiration and a challenge found at the


Two Snow Ladies

Hello there!
I'm posting some inspiration today on behalf of

My DT card is a Christmas in July creation using
Prickley Pear Circle Peek A Boo Die.


This is a gatefold card with a belly band.

I stamped and colored the images with Castle Arts Soft Touch Pencils and
used a clear sparkle pen on some parts.
Fussy cutting was done.
The front panels of the card were matted with a patterned paper.
I stamped a white panel with a sentiment for the inside of the card,
added a strip of patterned paper to the bottom and holly leaves to the top.
One of the snow ladies was added.
The other snow lady was adhered with foam tape onto
layered circle die cuts, which were added to the white belly band.
I added a stamped sentiment which was die cut in a banner shape.
Holly leaves were added.

We would love for you to connect with us in the

You can find more Pajama Crafter Stamps inspiration from 
other design team members and are welcome to post your creations
 using Pajama Crafter Stamps products.

Also follow on Instagram @pajamacrafterstamps.

Thank you so much for stopping by!


*********************************************
Linking up to:
Creative Knockouts - Christmas in July
Krafty Chicks Challenge - All Occasions
Daisy Chain Challenges - Christmas in July

Wednesday, July 24, 2024

Paperclip Embellishments & Folio

Are you looking for a good way to use all those card stock scraps you have piling up? 


Hey there!Today I'm sharing my latest CutCardStock DT project. Maybe you’re not like me and have mounds of paper scraps. I just can’t seem to throw any away, because, I may just need them for something??? So I have put some to use by making these paperclip embellishments.


Use these in a multitude of ways. You can use them in planners or journals. Or, use them for a quick card project or on a scrapbook page! I put together 12 of them thinking each one could represent months of the year. And since CutCardStock has envelopes as July’s Monthly Specials, I also put together a folio made with 2 large envelopes to store them in.

Let’s start!

Paperclip Embellishments

Pull out a bunch of card stock scraps and paperclips that measure 2 inches.


I am using cardstock that includes: multiple colors of Lessbo Premium Discount Card Stock, DCS Discount Textured and Pearlized Textured Card StockStardream Metallic Card StockBasis Card Stock, Bright Foil 10 pt Card Stock


Cut small tags to use as bases for these embellishments and die cuts for decorating the tags.


Photos below show steps taken to put together each of the paperclip embellishments.


Score at the top end of the tags to fold over the longest edge of the paperclips. Glue down on back of the tags.


Gather die cuts and/or other pieces to decorate.


Adhere


Complete construction of all your paperclips.


Paperclip Folio

Now lets put together a simple little folio to hold our paperclip embellishments.


All you need is 2 envelopes, some card stock, ribbon and adhesive of choice.

I am using 2 Cougar Premium White 7.5 inch Square Envelopes.


With one envelope in the left hand and the other in the right, slip the flap of the one on the right into the opening the the one on the left. Adhere the flap of the left envelope to the front side of the right.


Score both envelopes 3 inches from the outside edges. Fold to the inside and burnish. Fold where the 2 envelopes come together. You have a folio.


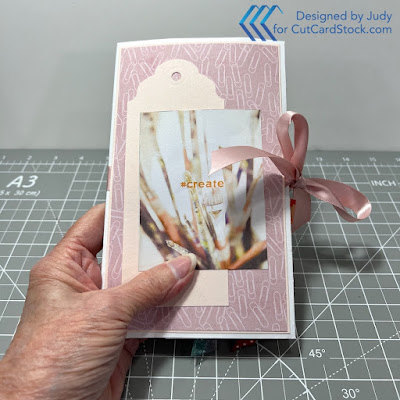
Cut card stock to cover the outside covers. I am using Basis Pink Card Stock to mat the patterned card stock and some cutouts for decorative pieces.


Center a piece of ribbon about 26 inches long around the front and back covers and adhere. Cover with the card stock and cut outs.


Cut 4 strips of card stock measuring 2 1/2 x 7 1/2 inches. Adhere these to the front and backside of the inside flaps. Attach only to the top and bottom edges, leaving the side open to slip the paperclips over.


Insert your paperclips. The envelope pockets are great for more paperclips and/or other embellishments.


Thank you for taking a look at my Paperclip Embellishments and Folio projects. I hope you like them as much as I enjoyed putting them together.


 Join us over on the CutCardStock Facebook Page and the newly revamped Facebook Group Creating with CutCardStock for more inspiration.


And even more inspiration can be found on the CutCardStock Blog
____________________________________________________________________


Check out my YouTube Video and please subscribe.


Saturday, July 20, 2024

Santa with Gift Sack

Happy Saturday!
Put this cute card together this morning for

This cute Santa digi is


My card is a simple slimline style.
I colored Santa with Prismacolor Pencils and fussy cut.
He was popped with foam tape onto a background comprised of
two card stocks from a 6 x 6 inch Recollections paper pad.
The "Ho Ho Ho' sentiment was die cut.

Visit the Conie Fong Art Etsy Shop for this digi and more!


Also, I hope you'll join us over on Facebook at
You'll find a new challenge up there for the rest of June and July.
We'd love to see your creations using Conie Fong digis there!

___________________________________________
If you would like to draw your own more simple version of a mermaid
________________________________________________

Conie Fong now has a You Tube Channel where she teaches drawing simple images 
in easy step-by-step drawing tutorials.


Also, we invite you to join the Draw with Conie Facebook Group.
You'll find info on new videos there and inspiration projects from the Design Team. 

*********************************************
Linking up to:
Crafty Catz - Make it Cute
613 Avenue Create - ATG option