Thursday, December 31, 2020

Fairy Centerpiece

 Hi there!
I'm sharing a DIY project today on the


If you know a little girl that would like a fairy themed birthday party this project would be perfect for a centerpiece. I created 5 wands and arranged in the container. The wands could even be given as party favors!


I die cut 4 fairies, 4 scalloped circles and 5 regular circles and punched 10 1 inch circles using the metallic card stocks.


I picked out 2 printed papers from my stash that coordinated with the metallic card stocks. From the printed papers I cut 10 strips 12 x 1 5/8 inches. These strips were scored along the 12 inch edge every 1/2 inch and accordion folded.


I created rosettes with the scored strips by attaching 2 strips into a circle and adhering to the punched circles.


I attached the rosettes to the scalloped die cut circles and I adhered the regular die cut circles to the top of the rosettes. These layered pieces were then attached to a small wood dowel, which painted silver.


I added the fairy die cuts next with foam squares.


Now I need a container to hold the wands so I chose a popcorn jar and decided I would cover it with 2 pieces of silver tissue paper.


I placed the jar in the center of the 2 pieces of tissue paper and brought the ends up to the mouth of the jar and tied with a piece of tulle. I added 3 pieces of floral foam to the inside of the jar to hold the wands.


I put together a 5th wand with a "Happy Birthday" die cut. I used some BASIS BLACK 80LB CARDSTOCK with the metallic card stock and one of the printed papers. I arranged the wands in the container and decided to add ribbon and tulle to the tallest wand. I also added some tulle over the opening of the container to mask the floral foam and my centerpiece is complete.


I hope I’ve inspired you with this project! If so, please leave a comment below, and we would love for you to connect with us on our Facebook Page.


I'm linking up to:


Wednesday, December 30, 2020

Snowman Hello

Happy Wednesday!
Just popping in to quickly share a card I created using

I had a lot of fun making this card!
I started by coloring the digi with Prismacolor pencils and fussy cutting.
I took watercolor paper for the background and
stamped the tree from the  Winter Flurries Stamp Set 4 times
using different green inks.
I then inked the background with blue inks.
I hand cut some white card stock to form a snowbank along
the bottom of the card.
The sentiment was printed from
I cut the into a banner shape.

Check out this digi download and
all the other products at
I know you'll find something you'll love!

I'm linking up to:
Love to Scrap Challenge - Winter Wonderland

Monday, December 28, 2020

Cute As A Button December Inspiration

Hello there!
I'm sharing some inspiration today here and on the

I have created a card using one of the newer digis at

This is


I colored the image with markers and fussy cut.
I did some die cutting and dry embossing to the rectangles
I popped the digital on to.
The sentiment was die cut as well as was the border.
I added some ribbon.


I hope you'll check this digi and all the 
other products available at

And, don't forget to join us each month for the Blog Challenge

I'm linking up to:

Sunday, December 27, 2020

Birthday Penguins

Hi there!
Today's my day to share some inspiration for
 
I've created a fun birthday card using

I love these little guys!
They are just too cute and who doesn't love penguins?

I colored with markers and fussy cut.
I ised a glitter card stock for my background for a little wintery shimmer.
I die cut the border up top and the sentiment.
I used plain white card stock and hand cut to
create a snow bank effect on the bottom of the card.
A litte sparkle pens was used there as well.
There are 3 sequins to embellish the lower right hand side.

I hope you like what I came up with and
that you'll check out this digital set along with
all the other products available at


We also invite you to join us for our monthly challenges at


And, of course, we would love to see you over in the


Have a great week!  

I'm linking up to:
Crafty Animals - ATG w/ animals
Love to Scrap Challenge - Winter Wonderland


Friday, December 25, 2020

Merry Christmas

Merry Christmas!
I hope everyone is having a great holiday season
in spite of all that has gone on this year.


It's time for this week's
Polkadoodles Craft Challenge!


 My project this week is a joy fold card with a little envelope inside
which is the perfect spot to place a gift card or cash.
I used one of the stamps from the Christmas Fishes Stamp Set 
as my focal and colored with markers. I used papers from


I hope you join us this week!
We'd love to see your projects!

I'm linking up to:


Wednesday, December 23, 2020

Stampers Delights K&C Advent Event

Hello there!
Stampers Delights is taking part in the

You can all the info you need to get this digital free for a limited time


I colored the image with Copics and fussy cut.
She is popped with foam tape onto a layered die cut circle.
My background paper is from Recollections.
I hand cut the banners, added some sticker presents
and a sticker sentiment.

I hope you grab your freebie and share with us in the

I'm linking up to:

Monday, December 21, 2020

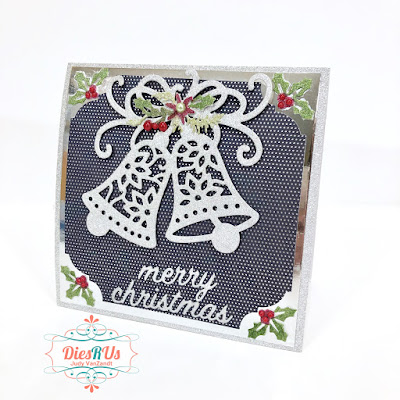
Christmas Bells Card

 Hey there!
Today I'm on the
 with a Christmas card project using dies from


I've made quite a few Christmas cards this year and
it is easy to create something pretty quickly with die cuts.

I gathered:

Silver Metallic Card
Silver Glitter Card
Navy Blue with Silver Polka Dots Card
White Card Stock 

I chose dies from 3 die sets:


I die cutting the glitter and printed card

I wanted to add a little color to some of the die cuts
so I pulled out alcohol markers and colored.
The glitter card I used colors up really well.
This is much easier and quicker than cutting the die cuts
several times and piecing together, which is always an option.


Next, I adhered a 5.5 x 5.5 inch piece of glitter card,
a 5.25 x 5.25 inch piece of silver metallic card  
and the printed die cut piece of paper
to the 5.5 x 5.5 inch card base I made with the white card stock.

Start adding your other die cut pieces


And you're done!


I hope I've provided some inspiration for you to
 play and create with your dies and we'd love for you 
to come and join in the fun at the Dies R Us Challenge Blog. 

There's a new challenge theme offered on the 1st and 15th of each month and one lucky randomly drawn winner will receive a gift voucher prize to the Dies R Us Store. 
For your convenience, all the important Dies R Us links are provided below.

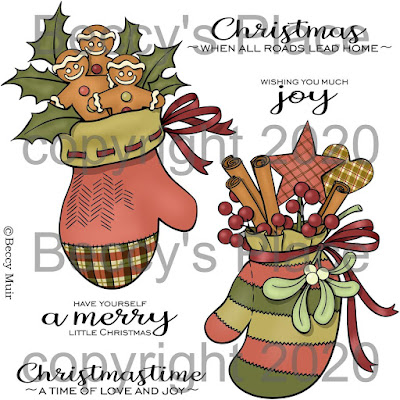
Beccy's Place Home for the Holidays

I'm back again today for another post!
This time around I have 2 projects I created for


When you purchase this digital set you will receive a zip file containing:
- 2 black and white line drawings
- 2 full colour images
- 4 word images / sentiments


I colored both of the digis for my cards with Prismacolor Premier Pencils.
I've included a color chart for the second card below.
I did some embossing and lightly sanded on the first card.
The second card was created by die cutting an ornament shape.
Both of the images were fussy cut and adhered to the cards with foam tape
for a little dimension.

I hope you'll check out this digital stamp set and
all the other products at
I know you can find something perfect for your crafting.

I'm linking up to:


Snowmen Frosty Hugs

Hey there!
I'm popping in for a quick post to share
another card using a new digital from


I tried to give a "snow globe" effect on my card.
I colored with Prismacolor pencils and fussy cut the image.
I die cut 2 circles and layered.
The sentiment was printed, die cut and layered behind the other circles.
The background was embossed with color applied to the embossing folder
with an ink pad for a letterpress effect.
I cut some narrow rectangles to create a snow globe base.
I die cut a small heart, applied to the base and added a bow.

I hope you'll take look at all the new
They are really fun to use for projects!

I'm linking up to:
Love to Scrap - Winter Wonderland

Sunday, December 20, 2020

New Friends Christmas

Hello!
How is everyone doing?
I hope everyone is fine and enjoying the holiday season.

Everything is good for me.
I still have a few projects to complete before Christmas day.

I wanted to share anther snowman card I created for


I colored with Prismacolor pencils, fussy cut,
did a little inking, embossing and stamped the sentiment.

This cute digs is just one of ten new 
They can be purchased individually or in a bundle and
come either in b/w or colored.

Check them out!
I mean, who doesn't love a snowman?

I'm linking up to:
Love to Scrap - Winter Wonderland


Saturday, December 19, 2020

Celebrate

Hi there!
I'm back today with another project
using one of the new digis from


I colored these cuties with markers and fussy cut.
The rectangle background was inked.
The background paper is from the
I die cut the sentiment and handcuff the banners.

I'll be back tomorrow with another project.
Thanks for taking a look!

I'm linking up to: