Monday, July 31, 2023

Clumsy Wanda

Hey there!
How's your Monday going?
I hope it's going better than Wanda's here!

This card was created with
Clumsy Wanda from Polkadoodles!

She's part of a whole collection that includes all you need
for all kinds of projects.


 I colored this cutie with pencils and fussy cut.
She's popped with foam tape onto the background.
I added some color along the bottom for a shadow effect.
The sentiment, which can be found here,
was printed onto the white background.
I added a die cut border done with a patterned paper from
Some twine and glitter dots were added for a little more pizazz.

Tanks for stopping by and have a great day!

_________________________________________________________
Linking up to:
Allsorts Challenge - Anything but Square

Thursday, July 27, 2023

Fabulous as You

Hi there!
Today I'm posting on behalf of

My DT card was created with one of the digis from a new set,

This set includes
  • 6 Design
  • 1 goup image and 5 Girls As Separate Images
  • 18 Digital Stamps
  • 7 Colouring Pages
  • JPG & PNG formats
  • 300 dpi

I have used the Scary Mel image.
She was colored with Prismacolor Pencils with some added glitter glue.
I fussy cut before popping onto the white background 
accented with die cut stars.
The sentiment was stamped and embossed.

For more inspiration hop over to the 

Thanks for stopping by and taking a look!
___________________________________________
Linking up to:
Unicorn Challenge - No Designer Paper
Die Cut Divas - Birthday

Saturday, July 22, 2023

Molly's Winter Friends

Happy Saturday!

I've made another card for "Christmas in July" for

This one was created with Molly's Winter Friends


I colored the digi stamp with Castle Arts Pasteltint Pencils and fussy cut.
My wintery scene was put together with a Create-A-Card die from
Crafter's Companion and by hand cutting some snowy hills 
out of white glitter paper. The patterned paper in the background is
from Crafter's Companion, as is the sentiment die.
I added glitter dots from Dollar Tree for a little embellishment.


Join us over on Facebook at

You'll find lots of inspiration there and we welcome you to share your 
projects created with Conie Fong products.

 ******************************************************
Linking up to:
Dragonfly Dreams - Christmas
Peace on Earth Christmas  - ATG Christmas
Craft Rocket Challenges - Christmas in July
Addicted to Stamps and More - Die Cuts or Stencils
Pearly Sparkles Challenge - Christmas in July

Polkadoodles Christmas in July

Happy Saturday!
It's time for this week's

Challenge theme Anything Goes

It's Christmas in July for the DT here this week! 
Have you started your Christmas cards for this year?
My card is a rocker style using All Wrapped Up Theo Penguin.
The card base was die cut and layered with glitter card stocker a snowy background.
I also die cut a couple of trees using the Layering Trees die cut set and
added some glitter glue and flocking to replicate snow.
Theo's "Happy Holidays" sentiment is from the


I hope you'll join us!

*******************************************
Linking up to:
Crafty Catz - Christmas in July Option
Craft Rocket Challenges - Christmas in July
Little Red Wagon - It's Cold
Get Creative Challenges - Christmas in July


Friday, July 21, 2023

Fence Card

Hey there! Today I'm sharing a summery designed fence card project for CutCardStock. Have you seen these? I just discovered them on Pinterest and thought I’d give one a try.


Card Stock

DCS Discount Card Stock – Calico Blue (on special this month)

DCS Shimmery Textured Wedding Cake White Card Stock (on special this month)

Cougar White Smooth CardStock (on special this month)

Pop Tone Gum Drop Green Card Stock

Card Base

Create the card base by cutting a piece of blue card stock to 4 1/4 x 8 inches. Score at 5 1/2 inches along 8 inch side.

Cut 1 piece of Wedding Cake White card stock to 4 x 2 14 inches, 4 pieces to 1/2 x 4 inches and 2 pieces 1/2 x 3 3/4 inches.


Construct the Fence

Place a piece of tape, washi tape or sticky note on the center, backside of the larger white piece straight down. This will help position the 4 fence railings. You’ll want the length of the top of the larger piece down to the bottom of the bottom railing to measure somewhere between 5 1/4 to 5 1/2 inches. I used a grid to help. Line the edges of the railings up with the outer edges of the top piece. I spaced each railing about a 1/4 inch apart. The other 2 3 3/4 inch pieces are lined up and glued just inside the outer edges to act as pence posts. My measurements are probably different than other tutorials you see, as I wanted a blue edge around my card.


I adhered this piece to the card base.

Embellishments

Die cutting was done using the Cougar White and Gum Drop card stock.


I added a little color to the white die cuts and also die cut a sentiment from the calico blue card stock.


Finishing

The greenery was added to the card base.


Flowers were added next.


Sentiment and the bee were added to complete.


Thanks for taking a look at my fence card project. I hope I’ve inspired you to try one, if you haven’t already.

As always, we would love for you to connect with us over on the CutCardStock Facebook Page and the Facebook Group Creating with Card Stock for more inspiration.

*************************************
inking up to:
Addicted to Stamps and More - Die Cuts or Stencils
Dream Valley Challenges - Use Dies and/or Punches
Die Cut Divas - Birthday

Thursday, July 20, 2023

CRAFT Challenge Guest Designer

I am honored to have been invited to be Guest Designer for this week's

 The theme for this challenge is
Shaped Card.

The sponsor for this challenge is

The Colour of Love


And the prize for this challenge is …

3 images from the store

___________________________________


I colored the image with Prismacolor Pencils and fussy cut.
A little glitter glue was added to some areas on the image.
My shaped card was formed with hexagon shaped die cuts.
I popped the image onto the card base with foam tape.
The sentiment was die cut.


Thanks for stopping by and thanks to 
the CRAFT DT for having me join in.

_________________________________________________
Linking up to:
Unicorn Challenge - No Design Paper

Saturday, July 15, 2023

Magician Wanda

 Hello there!
What are we all up to this weekend?
It's Saturday afternoon here in Colorado and I'm feeling kind of lazy.
I did get some crafting in this morning and I'll be going
to see my grandson tomorrow! Can't wait for that!

In the meantime I thought I would share another card I made
using one of the new Wanda Printables from


This is a twisted easel card design.
I colored Wanda with Prismacolor Pencils and die cut banner shape.
Some stenciling was done using gold texture paste and
The playing cards, hat and wand are ephemera which is in the
The sentiment from Wanda Printable Messages and Quotes was printed and die cut.
Some die cut circles were also used.

Check out this collection!
It's great for any and all craft projects!

**************************************
Linking up to:
Creative Creases - ATG w/fun fold
Addicted to Stamps and More - Die Cuts and Stencils
Unicorn Challenge - No Design Paper


Thursday, July 13, 2023

Posh Victoria

 Hey there!
Today I'm sharing my DT card created for

This is Posh Victoria and she is part of the new


When you purchase this set you get

  • 6 Design
  • 1 goup image and 5 Girls As Separate Images
  • 18 Digital Stamps
  • 7 Colouring Pages
  • JPG & PNG formats
  • 300 dpi
I colored her with markers and fussy cut.
Some silver glitter glue was added to her dress and boots.
A simple slim line layout composed of pretty card stock from CutCardStock,
a die cut sentiment using a die from Crafter's Companion and
some glitter dots from Dollar Tree.

For more inspiration hop over to the 

Thanks for stopping by ad taking a look!
_________________________________________
___________________________________________________
Linking up to:
Unicorn Challenge - No Designer Paper


Wednesday, July 12, 2023

Crafty Gals Corner Christmas in July

 Happy Wednesday everyone!
It's time for this month's challenge at

The theme for this challenge is: 

~ Christmas in July ~

 Our sponsor for this challenge is: 


Prize ~ 3 Single Digis

Conie Fong is a self-taught artist residing in California, USA with her husband, daughter, pet hamster and fishes.  In her early childhood years, she was inspired by every kind of art and crafts.  She loved watching demonstrations by artists on the streets and at festivals and spent most of her free time perusing arts and crafts books in the library, drawing, crafting and experimenting with her art supplies at home.  Conie first started sharing her art with the world by selling ACEO reprints of her ACEO paintings of fairies, mermaids, and kitty art on Ebay in 2010.  She was a full time account manager for a University before becoming a full time mom and part time artist.  She currently enjoys spending time with her family traveling, exploring the outdoors, and designing beautiful, cute, and magical art for craft and coloring lovers. 

   Conie offers crafters who view the CGC blog a 25% discount during our sponsored month - the code is JULYSPONSOR25.
_______________________________________________


I colored this sweet image with Prismacolor Pencils and fussy cut
The background is an embossed paper  from Crafter's Companion.
I die cut a frame and inked the embossed paper behind the image.
The sentiment was die cut. I added ribbon and pearls.
A simple but effective design, at least I think so.


I hope you'll join us and share your Christmas in July projects!

************************************************
Linking up to:


Pearly Sparkles Challenge - Christmas in July 

Sunday, July 9, 2023

Merry & Bright

Hi there!
We have been celebrating "Christmas in July" at

And there is a sale going on!
This is for the entire store and no coupon is needed.


My DT card for this event was created with


I colored this sweet image with Prismacolor Pencils and fussy cut.


The background is comprised of die cuts from Crafter's Companion.
The foliage and ribbon die cuts were cut out of white card stock.
I colored them with glitter gel pens and markers.
Glittery and metallic card stock from CutCardStock, gems and some glitter glue and stickles 
were added for lots of sparkle!
I die cut the sentiment twice, gold and red, and layered for a shadow effect.


Join us over on Facebook at

Saturday, July 8, 2023

Just Because Card

Hi there!
I'm here today sharing my DT card for this week's

The theme is ANYTHING GOES.

 My DT project this week is a card with a "Just Because" theme. I used
 Natures Beauty as my focal image, colored with prismacolor Pencils.
She is popped with foam tape onto a die cut and layered background.
The patterned paper behind the die cuts is from
I used a sentiment from the Watercolor Flower Stem Download.


I hope to see you entries in the challenge!

____________________________________________
Linking up to:


Friday, July 7, 2023

Birthday Wanda

Happy Friday!
Popping in to share a tag created with one of the new Wanda printables from

This collection of printables has everything you need to create unique projects.


I colored Wanda with pencils and fussy cut before adding
to my tag that uses one of the digital paper patterns from Set 3.
The pre-colored balloons, bunting and present are all included in the
Big Kahuna Deal, as is everything else!
The sentiment is from Messages and Quotes.
I added some inking, some ribbon, a button and some twine.

Check it all out!
It's really fun t play with!
________________________________________
Linking up to:


Thursday, July 6, 2023

Stamping, Embossing and Perfect Pearls

Do you have supplies you’ve had for a while but have yet to use? Hey there, today I’m sharing a card project created for CutCardStock. And, I must confess, I used some supplies I’ve had for quite a while and have not used until now, Perfect Pearls.

There are many ways to use Perfect Pearls and I chose to use them as a watercolor on a black background. The shimmer created with this medium is really pretty.


Materials

DCS Discount Card Stock: Black Card Stock

Basis WHITE 80lb Cardstock

3 clear stamp sets from Crafter’s Companion: “Enchanted Forest Fairy Wishes”, “Fairy Door’ and “Sparkle Garden”

Versamark Watermark Ink

3 Embossing Powders: White and clear from Crafter’s Companion and Lilac Pastel from Stampendous

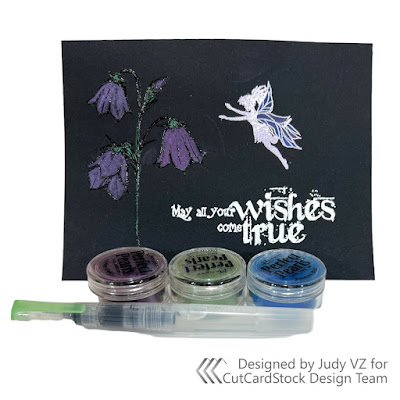
Perfect Pearls: Forever Green, Forever Violet and Forever Blue

Stamping and Embossing

I started by trimming a piece of black card stock to 4 1/2 x 6 inches.

The sentiment was stamped with Versamark and embossed with white embossing powder.

A flower image was stamped and embossed with clear embossing powder and I stamped a fairy and embossed with lilac embossing powder.

The flowers and fairy wings were colored with Perfect Pearls using a water brush to apply.


Perfect Pearls

The flowers and fairy wings were colored with Perfect Pearls using a water brush to apply.


Here’s a little closer look at the shimmer of the Perfect Pearls.


Assembling the Card

A 5 x 6 1/2 inch card base with top fold was created by trimming a piece of black card stock to 10 x 6 1/2 inches, scoring at 5 inches along the 10 inch side and folding in half.

I cut a piece of white card stock to 4 7/8 x 6 3/8 inches. The stamped, embossed and colored piece was trimmed to 4 1/2 x 6 inches. both these pieces were centered and adhered onto the black card base.

I hope you have enjoyed my project and provided a little inspiration!

As always, we would love for you to connect with us over on the CutCardStock Facebook Page and the Facebook Group Creating with Card Stock for more inspiration.

__________________________________________
Linking up to:
Unicorn Challenge - No Design Paper