Showing posts with label Cut Card Stock. Show all posts

Wednesday, September 3, 2025

Embossed Masculine Birthday Cards

 When it comes to handmade birthday cards, sometimes it’s nice to step away from florals and bright colors. It can be fun to create something with a more masculine edge. Hey there, It’s Judy here sharing my latest project for CutCardStock. I am creating two embossed birthday cards that feature metallic highlights, bold textures, and clean designs—perfect for the men in your life.


Supplies 

Embossing for Striking Backgrounds

Both of my cards start with embossing panels. Using gear and clock embossing folders, I created dimensional backgrounds that really pop when highlighted with metallic cardstock and ink. Embossing is such a simple technique, yet it adds instant texture and interest.

  • Card One (Left): I used a gears embossing folder on Lessebo Navy Blue Cardstock and lightly rubbed on silver gilding wax to enhance the raised details. The sentiment is cut from Stardream Metallic Silver Cardstock and layered with a bold “birthday” die cut. “happy” was stamped and heat embossed. 3 silver, glitter enamel dots finished off the design.

  • Card Two (Right): For this version, I embossed clocks onto Lessebo Navy Blue Cardstock. I applied silver metallic ink onto the embossing folder to give the cardstock an aged or patinated look. Then lightly apply bronze gilding wax with a finger. Layering the embossed panel with Stardream Metallic Copper Cardstockgave it a warm, industrial look. The “Happy Birthday” sentiment is die cut to match, tying the whole design together.


Why I Love These Cards

These cards are a great reminder that masculine cards don’t have to be plain or boring. The combination of texture, metallic shine, and strong contrasts creates an eye-catching look that works for birthdays and beyond. Plus, backgrounds with embossing are quick to make and they are easy to adapt with different color schemes or sentiments.


Final Thoughts

Embossing is one of my go-to techniques when I want to make cards that look polished with minimal effort. These masculine birthday cards came together quickly, yet the results are bold and striking. Whether you’re making a card for your dad, brother, husband, or a friend, this style is sure to impress!


Join us over on the CutCardStock Facebook Page and the Facebook Group Creating with CutCardStock for more inspiration.


 And even more inspiration can be found on the CutCardStock Creative Blog.


Monday, August 18, 2025

Elegant "With Love" Card

 Looking for a way to add a touch of elegance to your handmade cards? 
This shimmering blue and silver “With Love” design is perfect for 
weddings, anniversaries, or any special occasion. 
The combination of metallic cardstock, intricate die cuts, and 
a beautiful bow creates a timeless keepsake.

I’m excited to share the steps to create this card, which, I think makes a beautiful anniversary card. But, you can adapt this design for birthdays or holidays simply by swapping the sentiment.


  • Ribbon: Sheer navy blue ribbon
  • Embellishments: Blue rhinestones or gems
  • Dies: Ornate background die, ornate label die & “With Love” sentiment die
  • Adhesives: Double-sided tape, liquid glue, foam tape

Step-by-Step Instructions

STEP 1 – PREPARE THE CARD BASE

Cut a 5.5″ x 11″ piece of Stardream Metallic Sapphire cardstock and score at 5.5″ to create a square top-fold card.


STEP 2 – CUT THE BACKGROUND LAYER

Using your ornate background die, cut a decorative panel from Stardream Metallic Vista cardstock. Adhere it to a slightly larger piece of Silver Bright Foil 10 pt Cardstock which peeks through the die-cut openings.


STEP 3 – DIE CUT SENTIMENT & LABEL

Die-cut the “With Love” sentiment from Stardream Metallic Sapphire cardstock. The ornate label is cut from Silver Bright Foil 10 pt Cardstock.


STEP 4 – ADD RIBBON 

Wrap sheer navy ribbon around the top portion of the card.


STEP 5 – ASSEMBLE THE CARD

Attach the decorated panel to the card base using double-sided tape.

Adhere the sentiment to the center of the ornate panel using foam adhesive for a raised effect.


Make a bow with the sheer navy ribbon. Add the bow to the top of the card. Small blue rhinestones add a pop of sparkle to the design.


Thanks so much for taking a look at my Elegant “With Love” Card project! 

I hope you give one a try for yourself.


Join us over on the CutCardStock Facebook Page and the Facebook Group Creating with CutCardStock for more inspiration.


Monday, August 4, 2025

Vibrant Birthday Card

 Looking to brighten someone’s special day? This vibrant birthday card is bursting with bold colors and cheerful layers—perfect for bringing a smile! Hey there! I'm here today with my latest project. Follow along as I walk you through the steps to create this sunny, die-cut design using cardstock from CutCardStock.

Supplies

  • Assorted cardstock from CutCardStock (sunset hues, blues, greens, and white)
  • Circle, cloud, hill, and sentiment dies
  • Die-cutting machine
  • Paper Trimmer
  • Adhesive
  • Clear embellishments/sequins

Create Sun Ray

Choose a mix of warm and cool cardstock shades and cut sunburst rays using your die or trimmer. I am using

Lessebo Sunflower Yellow

Pop Tone Orange Fizz

DCS Flame Tree Orange

Lessebo Bubble Gum Pink

DCS Amaranth Pink

Lessebo Dawn Maroon

DCS Hydrangea Purple

Pop Tone Grape Jelly

Lessebo Aubergine


I cut each ray with a paper trimmer. To start cut each piece 7/8″ wide & 3″ long. Mark the bottom of each piece at the center. Trim diagonally from the top to the center mark on each side.

Adhere the rays to a Cougar White Smooth 4″ x 5 1/4″ background panel in a fanned-out pattern to mimic the rising sun. I mark the center of the background panel to help align the rays as the photos show.


Trim the rays with the edges of the background panel.


Die cut pieces for the sun, clouds and hills using

Lessebo Sunset Orange

DCS Indigo Blue

DCS Blue Calico

Lessebo Salt Water

DCS Mantis Green

Pop Tone Gum Drop Green


BUILD SUN CLOUD AND HILL LAYERS

Center the circle die cut.

Add blue cloud dies starting with the darker color up top, then medium blue and light blue.

The green hill die cuts go on next.

Adhere the die cut sentiment cut from Cougar White Smooth to the bottom. 

I cut a piece of Cougar White Smooth to 4 1/4″ x 11″. Score at 5 1/2″ along the 11″ side and fold to create a top folding A2 card base. 

Adhere the background panel to the card base.


EMBELLISH WITH SPARKLE

Add a few clear sequins or gems across the card front to give it a touch of sparkle and a polished finish.


Final Thoughts


This card is a celebration in itself—colorful, happy, and full of texture. It’s perfect for birthdays, encouragement, or any occasion that needs a little extra sunshine.

 Shop all the vibrant cardstock used in this project at CutCardStock.com and

 don’t forget to tag us if you create your own version!

__________________________________________________

Linking up to:
A Place to Start - ATG w/Summer Things Twist
______________________________________________________
CHALLENGE RECOGNITION


Wednesday, July 2, 2025

Patriotic Wreath

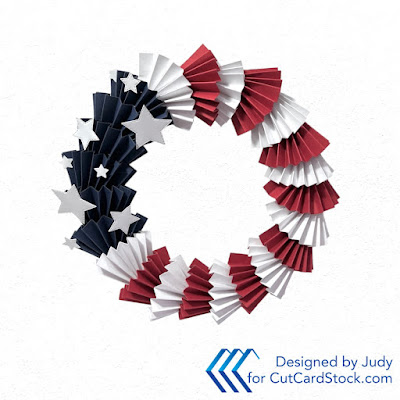
Do you like creating home decor projects? if so, now is the perfect time to make a Patriotic Wreath that is fairly simple and easily made with minimal materials. Hey there! It’s Judy here with my latest project for CutCardStock.


Cardstock & Wreath Form

For this Patriotic Wreath I am using, of course, red, white and blue cardstock.

DCS Discount Cardstock: Smooth Red Wagon 

Cougar White Smooth CardStock 

Lessebo Colors NAVY BLUE Cardstock


To start you’ll want to make a wreath form. I am using a piece of cardboard. Find something round you can trace onto the cardboard for the outside edge. I used a plate. You’ll need a smaller circle shape to trace for the inside edge. A smaller plate works. Cut both circles.

My wreath form measures about 10 inches on the outside. The inner circle opening measures about 7 inches. You can go larger or smaller.


Wreath Components

Cut the cardstock into strips measuring 8 x 1 3/4 inches. I cut 6 blue, 8 red and 9 white pieces. You may cut more or less depending on the size of your wreath form.


Score each cardstock strip every 1/2 inch along the 8 inch side.


Accordion fold each strip along the score lines.


Start adding the accordion fold strips to the wreath form. Hold one end of the folds together and apply glue to the backside. A low temp glue gun works well for this. Adhere the end with the glue across the width the the wreath and fan out the top, as seen in the photo below.


Add all the blue pieces by overlapping about 3/4 of an inch. I alternate the white and red strips adhering in the same fashion all the way around. The last piece is a little tricky. Just tuck the end with glue into the first blue piece.


To embellish I die cut various size stars.


Start adhering the stars randomly.


Add the rest of the stars to complete. I did punch a few more small stars to add.


Thanks so much for taking a look at my Patriotic Wreath project. But, this wreath is not really limited to the patriotic theme. You can use my idea to create a wreath for any occasion, season or holiday and I hope you’ll give it a try!


Join us over on the CutCardStock Facebook Page and the newly revamped Facebook Group Creating with CutCardStock for more inspiration.

 And even more inspiration can be found on the CutCardStock Creative Blog.

************************************
Linking up to:
Classic Design Challenge - ATG w/Masculine option
A Place to Start - ATG w/Recycle Twist (cardboard wreath base)
613 Avenue Create - ATG w/For the Guys twist

__________________________________________
CHALLENGE RECOGNITION