Saturday, October 28, 2023

Thank You Card

This week's Polkadoodles Craft Challenge is up and running! 
The challenge theme is
ANYTHING GOES.

The DT was asked to create a project with a theme of
Thank You/Thanksgiving.

I made a thank you card using Hello Cute Autumn Fall Fox as my focal.
He was colored with Prismacolor Pencils and fussy cut before 
popping with foam tape onto a layered die cut circle.
The flowers were printed from the Ephemera Autumn Fall Fox Download 
and fussy cut. My background paper is from Noodle Panda Set 2 Printable Papers.
I printed the sentiment from the Winnie Heroes Printable Bundle and die cut.
3 pearls were added to complete my design.


Won't you join us?
We'd love to see your Anything Goes creations!

_______________________________________________
Linking up to:
Crafty Catz - ATG/Twist Any 4 Legged Critter
Krafty Chicks Challenge - All Occasions

Thursday, October 26, 2023

Let's Eat Candy

Hi there!
Today I'm posting on behalf of

I made a Halloween card using


Digital Download

  • 2 Design
  • 1 Sentiments
  • 8 Digital Stamps
  • JPG & PNG formats
  • 300 dpi


I colored the digi and background with Prismacolor Pencils.
Added solid colored card stock and hand cut banners behind the image.
The "Let's Eat Candy"sentiment is a dazzles sticker from Paper Wishes,
which I backed with orange card stock and fussy cut.

For more inspiration hop over to the 

Thanks for stopping by and taking a look!


___________________________________________
Linking up to:
Little Red Wagon - Trick or Treat
CRAFT Challenge - Thanksgiving/Halloween
Craft Rocket Challenges - Autumn and/or Halloween
Unicorn Challenge - Autumn and/or Halloween

Wednesday, October 25, 2023

Christmas Girl Elves

 Happy Wednesday!
I hope all is well with all of you.
I certainly can not complain and am enjoying that 
we're finally starting to get some cooler weather.

Today I am sharing a cute card created with
I have used the image with all 3 elves, but 
they can also be purchased separately.


Here's a little closer look.


I colored with Castle Arts Soft Touch Pencils.
A little glitter glue was added.
The printed image was trimmed to a rectangle and matted.
I added die cut and embossed borders behind.
A die cut sentiment and die cut embellishments were added.
A double matted patterned paper is in the background.


I do hope you'll check this cute digi out along with all the other
fabulous digis available in Conie's Etsy Shop.

Also, I hope you'll join us over on Facebook at

You'll find lots of inspiration there and we welcome you to share your
creations using Conie Fong products!

***********************************
Linking up to:
Cut it Up - Add a Sentiment + Die Cut

*******************************************
Guest Designer Offer - Your Scrapbook Place


Friday, October 20, 2023

Halloween Decor

Hey there! Today I'm here with a fun Halloween Decor Project created for CutCardStock!

Do you like decorating for Halloween? If so this piece can be disiplayed on a table, shelf or hung on the wall. Mixing it with a few other Halloween elements would make a fun vignette.


Stamping

I wanted to have a witch in the project, so I chose to use one of my Julie Nutting stamps and dress her like a witch. A witch’s hat and broom were stamped from a Hampton Arts stamp set.

These items are paper pieced. They were stamped on various card stocks.

DCS Discount 8.5×11 Card Stock: Smooth Sand Castle Tan 

DCS Discount Card Stock: Vanilla Bean Brown Card Stock

DCS Discount Card Stock: Textured Flame Tree Orange Card Stock

DCS Discount Card Stock: Plum Purple 8.5×11 Discount Card Stock

Basis 8.5×11 GREY 80lb Cardstock


Different colored inks were used for stamping.


I fussy cut my pieces and put together.

Base

The base for the piece is an 8 1/2 x 7 inch piece of KRAFT CHIPBOARD .05 covered with an 8 1/2 x 7 inch piece of DCS Black GLITTER Heavyweight 12×12 Discount Card Stock.

I love this chipboard! It is so nice and sturdy! The glittered black card stock gives the illusion of stars.

Embellishment

To decorate the base background I did some die cutting and border punching. The moon piece was stamped and fussy cut. My word piece is from a Recollections Halloween paper pad, which I fussy cut. I also hand cut a piece of the gray card stock to create a larger tree base.


The punched, die cut, hand cut and paper pieced elements are added to the base.


Finishing

A few more die cut pieces added along with some stamped spiders and we’re done. 

I’m showing the option of hot gluing a piece of ribbon to the back for hanging on the wall.


As always, I appreciate you taking the time to check out my Halloween Decor Project.

We would love for you to connect with us over on the CutCardStock Facebook Page and the Facebook Group Creating with Card Stock for more inspiration.

                                                                                                                                                             
Visit the CutCardStock Blog for more inspiration.

And, as always, we would love for you to connect with us over on the CutCardStock Facebook Page.  the Facebook Group Creating with Card Stock for more inspiration.

__________________________________________
Linking up to:
Most Magical Time of the Year Challenges - ATG Halloween or Christmas
CRAFT Challenges - Halloween/Thanksgiving
Unicorn Challenge - Autumn and/or Halloween
The Crafting Challenge - Waiting for Halloween/Autumn
613 Avenue Create - ATG/ Autumn Colors Option
Crafty Calendar Challenge - Autumn Colors/Halloween
________________________________________________


Thursday, October 19, 2023

Too Cute to Spook

Hello there!
I'm popping in today to share some more Halloween inspiration!

This time for Polkadoodles.

 I have used one of the cute digis from the


I have colored this cutie with Prismacolor Pencils and fussy cut.
The background paper is from 
I printed the sentiment from the
Some small pieces of solid color card stock were added behind the image.
Enamel dots complete the card.

I so appreciate you stopping by!
Have a great day!

*****************************************
Linking up to:
The Paper Shelter Challenge - Halloween or Halloween Colors
Little Red Wagon - Patterned Paper or Not
Unicorn Challenge - Autumn and/or Halloween
Daisy Chain Challenge - Autumn and/or Halloween
______________________________________________


Tuesday, October 17, 2023

Wynona Pumpkin Kitty

Hello there!
How's it going?
I hope all is well with everyone.
I certainly cannot complain!

Today I have a card project created for

I have used the adorable digi called


My card is a rocker style done with scalloped die cuts.
The image was colored with Prismacolor Pencils and fussy cut.
She is popped with foam tape over flourishes, a fence and
scalloped circle dies cuts. I inked the blue and green in the background.
The sentiment was stamped.


I do hope you'll check this cutie out along with all the other
fabulous digis available in Conie's Etsy Shop.

Also, I hope you'll join us over on Facebook at

You'll find lots of inspiration there and we welcome you to share your
creations using Conie Fong products!

*****************************************
Linking up to:
Try it on Tuesday - Halloween
Daisy Chain Challenge - Autumn and/or Halloween
613 Avenue Create - ATG /Twist Autumn Colors
The Crafting Challenge - Waiting for Halloween/Autumn
________________________________________________


Saturday, October 14, 2023

Halloween Time

Hi there! 
It's time for this week's

This week's DT card is all about autumn colors
mixed with a tiny bit of Halloween!
The focal image is from the new
I colored with Prismacolor pencils and fussy cut.
I've stenciled the sky with blue ink and die cut the hills with 
The fence was die cut and embossed with an embossing folder.
I printed the sentiment from Ghastly Ghost Halloween Printables and die cut.


Challenge theme is
ANYTHING GOES!

Hope you join us!

_____________________________________________
Linking up to:
Craft Rocket Challenges - Autumn and/or Halloween
Unicorn Challenge - Autumn and/or Halloween
613 Avenue Create - Autumn Colors Twist
______________________________________________


Thursday, October 12, 2023

Trick or Treat Card

Happy Thursday!
Today I am posting on behalf of

This inspiration card was created with


The digi was colored with pencil colors.
I used a round die to cut around the image.
The background was done with a bat patterned card stock and
solid color banners which were die cut or hand cut.
The sentiment was stamped and trimmed.
The 3 orange dots in the upper right were punched with a plain old paper punch.


For more inspiration hop over to the 

Thanks for stopping by and taking a look!

____________________________________
Linking up to:
Craft Rocket Challenge - Autumn and/or Halloween


Wednesday, October 11, 2023

Halloween Colors Card

Hey there!
It's the 2nd Wednesday of the month and that means a new challenge at

The theme for this challenge is: 

~ Halloween Colours~

 Our sponsors for this challenge are: 

Colour of Love
Prize ~ 3 Digital Images

* * * * * * * * * *

Prize ~ 3 Sets of Digis

* * * * * * * * * *

Prize ~ 3 Digital Images

**********************************************
My DT card was created using: 
LeAnn's World 101


I colored this cute image with Prismacolor Pencils and hand cut.
Some glitter glue was added to the moon, stars and bat eyes.
A couple of borders were die cut and added behind the patterned papers and image.
The sentiment was stamped and trimmed into a narrow strip.
Purple glitter dots were added to complete my design.

I hope you join us with your "Halloween Colors: projects!

******************************************
Linking up to:
Unicorn Challenge - Autumn and/or Halloween
Dream Valley Challenges - Occasions other than Birthday
Inspiration Station - inspired by pumkins and purple witch hat

613 Avenue Create - ATG w/Autumn Colors Twist
Crafty Calendar Challenge - Autumn/Halloween
Craft Rocket Challenges - Autumn and/or Halloween
The Four Seasons Challenge - Anything Fall Goes

__________________________________________


Friday, October 6, 2023

Quick & Easy Greeting Card Set

Hey there! I'm here today with a quick and easy project created for CutCardStock.


This is a greeting card set using Basis A-2 Folded Blank Note Cards, which are on special this month. These card blanks are great and make it super easy to make cards quickly. Make a set and give as a gift or keep for yourself to use. I used a color wash technique and stamped silhouette images with black ink directly on the card bases. Can’t really get much easier than that! 

Materials

Basis A-2 Folded Blank Note Cards in Natural

Inkadinkadoo Meadow Stamp Set

Gemini Joyful Phrases Stamp Set

Spectrum Noir Finesse Stamp Pad Noir Black

Spectrum Noir Sparkle Pens in Moonstone, Soft jade, Moonlight, Rose Quartz, Cosmos and Clear


Color Washing

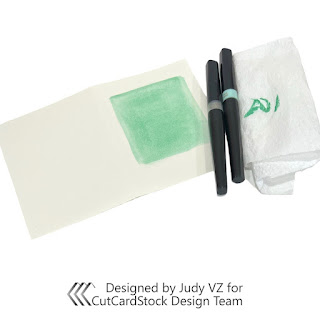
One color of sparkle pen was used on each card. Just simply “scribble” the color on and blend with the clear sparkle pen.


 I also rubbed over the color with a dry paper towel just to smooth out a little more and help dry.


Stamping

I used a Tim Holtz Stamping Platfrom for the stamping. This makes it so easy to stamp uniformly on each card.


The same floral image and butterfly were stamped on each card. The sentiments are different. And we have a complete set of 5!


Now, I could have stopped here but, decided to put together a folio to hold the card set.

Folio

An 8 1/2 x 11 inch piece of Basis NATURAL 80lb Cardstock was used.

I scored at 5 1/2 inches along the 11 inch side and 2 1/2 inches along the 8 1/2 inch side.

Cut along the center score mark up to the 2 1/2 inch score mark. Then make an angled cut from the bottom to the center to form tabs. This will form the pockets on either side of the folio. 


Add double sided tape to the outside of the pocket tabs, fold up and adhere.


To decorate the front cover of the folio I used the same stamp as the cards. I stamped onto a piece of Basis Natural card cut to 4 1/4 x 4 3/4 inches. This piece was layered onto a piece of Stardream Metallic KUNZITE 105lb Card Stock measuring 4 3/4 x 5 1/4 inches. A 28 inch piece of ribbon was cut to act as a closure.


The ribbon was adhere to the center of the folio’s front and back covers and the stamped piece was placed over.

Slip the cards and your envelopes into the pockets, tie the ribbon and this quick and easy greeting card set is complete and ready for gifting and/or use.


As always, we would love for you to connect with us over on the CutCardStock Facebook Page and the Facebook Group Creating with Card Stock for more inspiration.
________________________________________________
Linking up to:
Stamping Sensations - ATG Option
Aud Sentiments - Ink Blending + Sentiment