Showing posts with label Clear Scraps. Show all posts

Tuesday, September 2, 2025

DIY Music Themed Decor

 If you love music and paper crafting like I do, this project is the perfect blend of both! 

 Today I’m sharing a fun and meaningful décor piece that features one of my favorite quotes: “Where words fail, music speaks.” With bold colors, glittery accents, and playful music notes, this project makes a beautiful display for your craft room, music studio, or as a gift for the music lover in your life.


Supplies Used:


Step 1: Cut the Quote

Cut or print your chosen quote—“Where words fail, music speaks.” I used black glitter vinyl to make the words stand out against the colorful background. 


Step 2: Apply Quote to Book Stand

Apply quote to the front side of the book stand. I’m only using the words from the cut file.


Step 3: Add Pattern Paper

Start by selecting bold patterned papers that will make your project pop. 


Trim the paper down slightly smaller than the backside of book stand. Add double sided tape to edges on front side of the paper.


Adhere


Cut 4 strips of black glitter cardstock about 1/4’ wide for a border. Adhere to front side of book stand.


Step 3: Embellish with Music Notes

Nothing says “music” like music notes! I used the chipboard embellishments, colored them with a black sparkle pen. Place them around the quote and project is complete.


Final Thoughts

I love how this project turned out—playful, bold, and full of meaning. Whether you’re gifting it to a music teacher, decorating a studio, or making something for yourself,  this project is sure to hit the right note! 🎶

Be sure and check out more Clear Scraps inspiration by following on social media

Clear Scraps Blog

Clear Scraps Facebook

Clear Scraps Instagram

Clear Scraps Pinterest   

Wednesday, August 20, 2025

Ooh La La Junk Journal

 Bonjour, crafty friends! Today, I'm excited to share a chic and feminine Paris-inspired junk journal created for Clear Scraps. With soft pastels, elegant embellishments, and a touch of vintage charm, this "Ooh La La" journal is perfect for capturing your favorite memories or gifting to a friend who adores all things Paris!


I am using the Large Square Journal Cover for this project.  This chipboard cover measures approximately 6.5 x 6.5 x 2 inches. A binding needle and wax thread are included.


Start by cutting card stock to size for the front and back of the cover. The spine piece is cut 5 inches wide and scored at 1 1/2 & 3 1/2 inches.

Adhere the card stock to each piece. The spine piece is adhered between the score lines.

Glue the 2 large pieces to the spine.


Choose some patterned papers for the front and back.

Cut down pieces to fit front & back.

I butt my pieces up to the card stock on the spine piece.

Cover the areas where the pattern paper meets the solid card stock with washi tape.


Finish the inside covers.  Adhere pattern papers. Add solid card stock to the spine area.


I put together 3 signatures measuring 6 x 6 inches. Some of the journal pages from the book I pulled patterned papers from along with some card stock, plain paper & some paper bags were used  The signature covers were made with patterned card stock.


The signatures were sewn in.


All that’s left is to embellish the cover.


I did some die cutting.


A ribbon was sewn beneath the signatures. I covered the spine on the outside with a rectangular piece of card stock and washi tape.  Flatback pearls were added. The ribbon was knotted.


The die cuts were adhered and I added some pearls to finish.


I love the way this journal turned out and appreciate you checking it out!


Be sure and check out more Clear Scraps inspiration by following on social media

Clear Scraps Blog

Clear Scraps Facebook

Clear Scraps Instagram

Clear Scraps Pinterest   

Monday, August 4, 2025

Blue Christmas Tags


Hey all! It’s Judy here with my latest project created for Clear Scraps.


I am using 4 of the #10 tags. 


I used the 6” Quarterfoil Stencil on 1 of the tags


My last project shared here on the blog was a Blue Christmas Tag Box and I wanted to create coordinating tags. And I wanted to make them with Prima Dolls, which I stamped and paper pieced.

The Chipboard Tags were traced onto the backside of patterned papers, cut and adhered. I did cover both sides.

I then added some fussy cut pieces from the patterned papers and die cuts. The Prima Dolls were added along with die cut sentiments. I added sequins to one of the tags and some gems to the other. Ribbons were added.


For the Acrylic Tags, I removed the protective film and added acrylic paint to the backside. 

The 1st tag has some stenciling and I added a patterned paper strip and fussy cut flowers.
The sentiment was fussy cut. I added ribbons.

The frontside of the 2nd tag has a layered die cut oval, fussy cut flowers and a die cut sentiment. Ribbons were added.


Thanks for taking a look at my project.

Be sure and check out more Clear Scraps inspiration by following on social media
Clear Scraps Blog
Clear Scraps Facebook
                                                           Clear Scraps Pinterest 


Friday, July 25, 2025

Blue Christmas Tag Box


Hi there! It’s Judy here with my latest inspiration project created for Clear Scraps.


Clear Scraps came out with some fabulous new products last month and I’m using 3 of them for this Blue Christmas Tag Box.


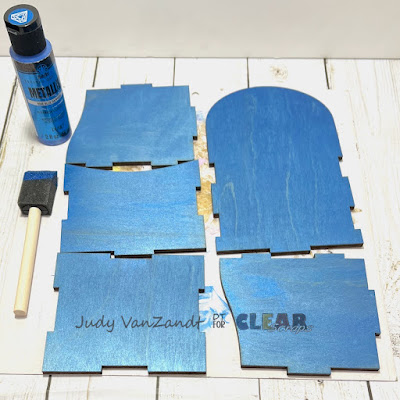
The new products I’m using are the DIY Wood Rounded Tag Box, Pine Trees Embellishments and Vintage Frames Chipboard Embellishments.


I decided to paint my box with a blue metallic acrylic paint. So, I did this to all the individual pieces.


Use wood glue to construct the box.


Some patterned papers were pulled out to add. I started by applying one of the papers to the front and sides of the box.


Other elements were pulled from my stash to add, wash tape and beaded garland.


I adhered the washi tape to the top edge of the patterned paper on the front and sides.

Patterned papers were picked out for both sides of the back of the box and trace.


Cut and adhere the traced papers to back of box.


With the box being decorated with paint and patterned papers, it’s time to add some embellishments. I add color to the chipboard trees with a green sparkle pen. Silver gilding wax is applied to the frame chipboard piece.


Adhere beading to the top edge of the front and side of the box.


I stamped and heat embossed “Merry Christmas” and glued behind the Chipboard frame. Adhere to the front. I also added some flowers fussy cut from patterned paper.


I added the chipboard trees to the back along with some fussy cut pieces and snowflake gems.


Thanks so much for stopping by. I hope I’ve provided some inspiration for your crafting.


Be sure and check out more Clear Scraps inspiration 

by following on social media


Clear Scraps Blog

Clear Scraps Facebook

Clear Scraps Instagram

Clear Scraps Pinterest