Saturday, September 28, 2024
October Birthday Card
Friday, September 27, 2024
Wynona Witch
_________________________________________________
Thursday, September 26, 2024
Happy Camper
Wednesday, September 25, 2024
Fancy Fold Card Duo
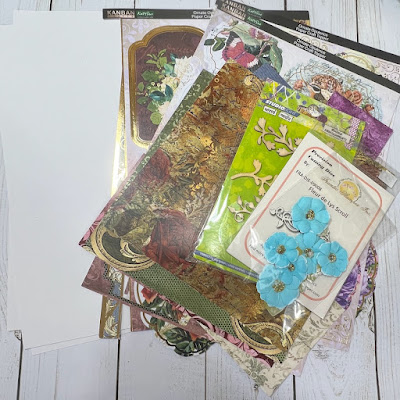
I pulled out the remaining items I have from the kit.
Looking these items over I thought I would create a couple of fancy fold cards.
The first is a Bridge Card design.
I started by cutting down a piece of the white card stock in the kit to 11 x 7 inches.
Then scored it at 1 1/2, 3, 8 and 9 1/2 inches. Fold and burnish as in the photo below.
To add some color to the white card stock I applied gold gilding wax around the edges of
the 2 outside panels and the center panels. The 2 interior panels were completely covered.
Next, I cut pieces of solid and patterned card stock to cover the card base and chose one of the toppers from the kit to use as the focal on the card.
One piece of burgundy card stock was cut to 4 3/4 x 6 3/4 inches, 2 pieces were cut to 1 1/4 x 6 3/4 inches.
A piece of gold was cut to 4 1/4 x 6 1/4 inches.
The patterned paper from the kit was cut to just under 4 x 6 inches.
I layered the larger burgundy, gold and patterned pieces of card stock and adhered to the center of the card.
The thinner burgundy panels are added to the 2 outside panels.
Pop the topper with foam tape to the center of the card.
We need a “bridge” for our card, so I cut a piece of patterned paper to
1 x 8 inches and a piece of gold 1 1/4 x 8 inches. Adhere these pieces together and attach to the 2 outside panels with the lower edge about 1/2 inch from the bottom of the card.
Next I applied gold gilding wax to 2 of the wooden embellishments from the kit and adhered them to the side panels.
I die cut a “Happy Birthday” sentiment and added it to the center of the bridge.
To finish this card, I pulled out the small white 49 & Market flowers from the
August Cards, Tags and More Kit. A little pink ink was applied to them.
They were added to the wooden embellishments.
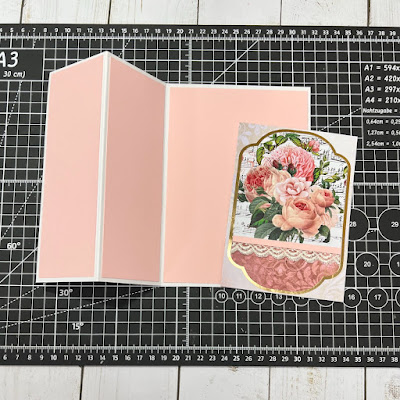
Start by cutting down a piece of the white card stock from the kit to 10 x 7 inches.
Score along the 10 inch side at 2 1/2 and 5 inches.
Make a mountain fold on the 2 1/2 inch score line and a valley fold on the 5 inch score line.
Take a 1 1/2 x 10 piece of white card stock, score at 5 and 7 1/2 inches.
Do a mountain fold on the 5 inch score line and valley fold on the 7 1/2 inch score line.
I pulled out some of the cut aparts, one of the topper pages and a scrap piece of patterned paper from the kit.
Cut 2 pieces of pink card stock to 2 1/4 x 6 3/4 inches and one piece to 4 3/4 x 6 3/4 inches.
Piece together the larger cut apart with pink flowers and scrap patterned paper onto a piece of white card stock. Lace was added where the two pieces come together.
I pulled out the “left over” part from one of the large toppers.
This will be used to frame the piece just put together.
Adhere the pink card stock to card base.
Glue the frame to the cut apart piece.
I added a 1/4 inch wide piece of pink card stock to the lace on this piece, under the frame.
It’s time to add the narrow z-fold piece. Add 3 pieces of pink card stock.
Two pieces are cut 1 x 2 1/4 inches and one is cut to 1 x 4 3/4 inches.
Pieces of the lace are also added.
Adhere this piece to the card base about 1/2 inch from the bottom,
with the 5 inch length on the left side and the other end to the right side.
I then took one of the smaller cut aparts and framed it similarly to the larger one.
For a sentiment, I took a round vellum die cut from this month’s
Tres Jolie Scrapbook Kit and cut circle die cut to place behind it.
Adhere the large cut apart piece to the center of the left panel of the card.
Glue the smaller cut apart to the right side of the card on the top half. I also place it far enough over that the larger cut apart covers it when the card is closed.
Add the sentiment to the right side of the card near the bottom,
again placing where it is covered when the card is closed.
The card is complete.
I hope you’ve enjoyed my project and I’ve provided you with a little inspiration!
Thanks so much Kim, for allowing me to Guest Design these last 2 months.
I have truly enjoyed working with your Tres Jolie Kits.
Be sure and check out all of the Tres Jolie products HERE
Also, click on the links below and follow Tres Jolie on Social Media for more info and inspiration!
Elegant Let It Snow Card
Hi there! It’s Judy here with a new project created for Clear Scraps! It is an elegant card created with chipboard shapes.
Using Chipboard Embellishment Punchouts
I started by painting and coloring the 2 chipboard pieces I chose to use.
The “Let it Snow” was colored with a dark purple sparkle pen.
I painted the snow flake with white acrylic paint.
Glitter glue was also added to the snowflake.
I set the chipboard pieces aside to dry and gathered pieces to create the card.
Lavender colored metallic card stock was used to make a 5 1/2 x 5 1/2 inch card base.
White card stock was cut to 5 1/8 x 5 1/8 inches to mat a patterned piece of paper cut to 5 x 5 inches.
I die cut a white square and circle and a glittered purple scallop circle.
The patterned paper was adhered to the white mat and this was added to the card base.
The die cut pieces were layered and adhered to the card.
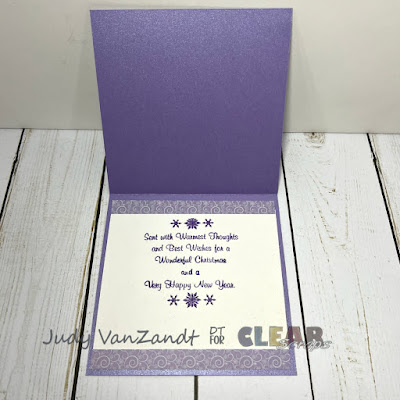
Next I worked on the inside of the card.
A white piece of card stock with a greeting was added to the center of the card. 1/2 inch strips of the patterned paper were added to the top and bottom.
Add the “Let it Snow” chipboard piece to the center of the card and the snowflake to the left side.
I added a gem to the snowflake and 3 small acrylic snowflakes, which I colored with an alcohol marker.
Thanks for checking out my project.
I hope I have provided some inspiration for you to use chipboard pieces on a card.
You can find more Clear Scraps inspiration
by following on social media
__________________________________________
Linking up to:
Addicted to Stamps and More - Christmas
A Place to Start - ATG
Aud Sentiments Challenge - Tags and/or Holidays + Sentiment
613 Avenue Create - playing ATG
Lil Patch of Crafty Friends - ATG
Peace on Earth Christmas Challenge - Anything Christmas Goes
Creative Fingers Challenge - ATG
CRAFT Challenge - Christmas
Classic Design Challenge - ATG
The Creative Crafters - ATG


